

XBee Studio’s Quick Setup feature simplifies the configuration of your Wi-SUN Development Kit devices by quickly applying predefined setups to them.
These setups can range from simple processes to more elaborate demos that include Python or MicroPython applications and other components to create a complete system.
The XBee for Wi-SUN Get Started quick setup prepares your devices to form a Wi-SUN network with the following parameters:
| Parameter | Value | ||
|---|---|---|---|
Network name |
Digi Wi-SUN - Network 1 |
||
Regulatory Domain |
3 (EU - Europe) |
||
Channel Plan ID |
32 |
||
PHY Operating Mode ID |
1 (FSK, 863.1MHz, 50 kbps) |
||
Network size |
Small (1-100) |
||
Authorization |
Open (any device with a trusted certificate may join)
|
| Parameter | Value | ||
|---|---|---|---|
Network name |
Digi Wi-SUN - Network 1 |
||
Regulatory Domain |
1 (NA - North America) |
||
Channel Plan ID |
1 |
||
PHY Operating Mode ID |
2 (FSK, 902.2MHz, 50 kbps) |
||
Network size |
Small (1-100) |
||
Authorization |
Open (any device with a trusted certificate may join)
|
Deploy the configuration onto the Wi-SUN Development Kit devices
To configure your Wi-SUN Development Kit devices with the XBee for Wi-SUN Get Started quick setup:
-
Ensure all XBee devices in the kit are connected to your PC.
-
Ensure the XBee Hive for Wi-SUN device is on the same LAN as your PC (for example, connect it over Ethernet to your PC’s access point).
-
Open XBee Studio and wait for all devices to be discovered.
-
If this is the first time using your XBee Hive for Wi-SUN device in XBee Studio:
XBee Studio needs access to the device to read and configure it. When credentials are missing, the device appears like this:
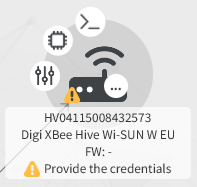
To provide the credentials:
-
Click the device. A credentials dialog appears.
-
Enter the username and password.
The default user is admin; the password is on the device’s label. -
(Recommended) Ensure Store credentials is selected to persist them across XBee Studio restarts so you don’t have to enter them again.
-
Click OK.
-
After validation, the following popup appears if shell support is not enabled in the device:
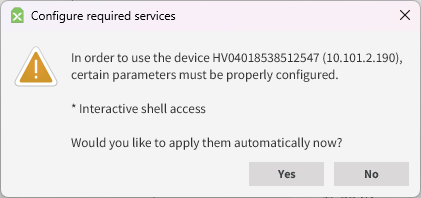
-
Click Yes to enable it.
-
XBee Studio reads all the necessary information of the XBee Hive for Wi-SUN device and opens its device tab.
-
At this point in the setup, a warning may appear in the Network information card within the tab similar to:
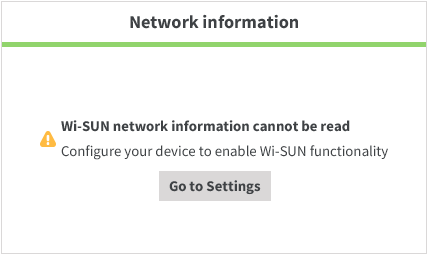
You may disregard this message; it will be addressed in upcoming steps.
-
Close the tab to return to the device browser.
-
-
By default, Wi-SUN is disabled, so XBee Studio shows your XBee Hive for Wi-SUN device like this even after credentials are provided:
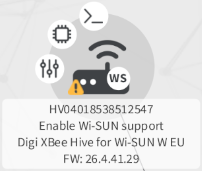
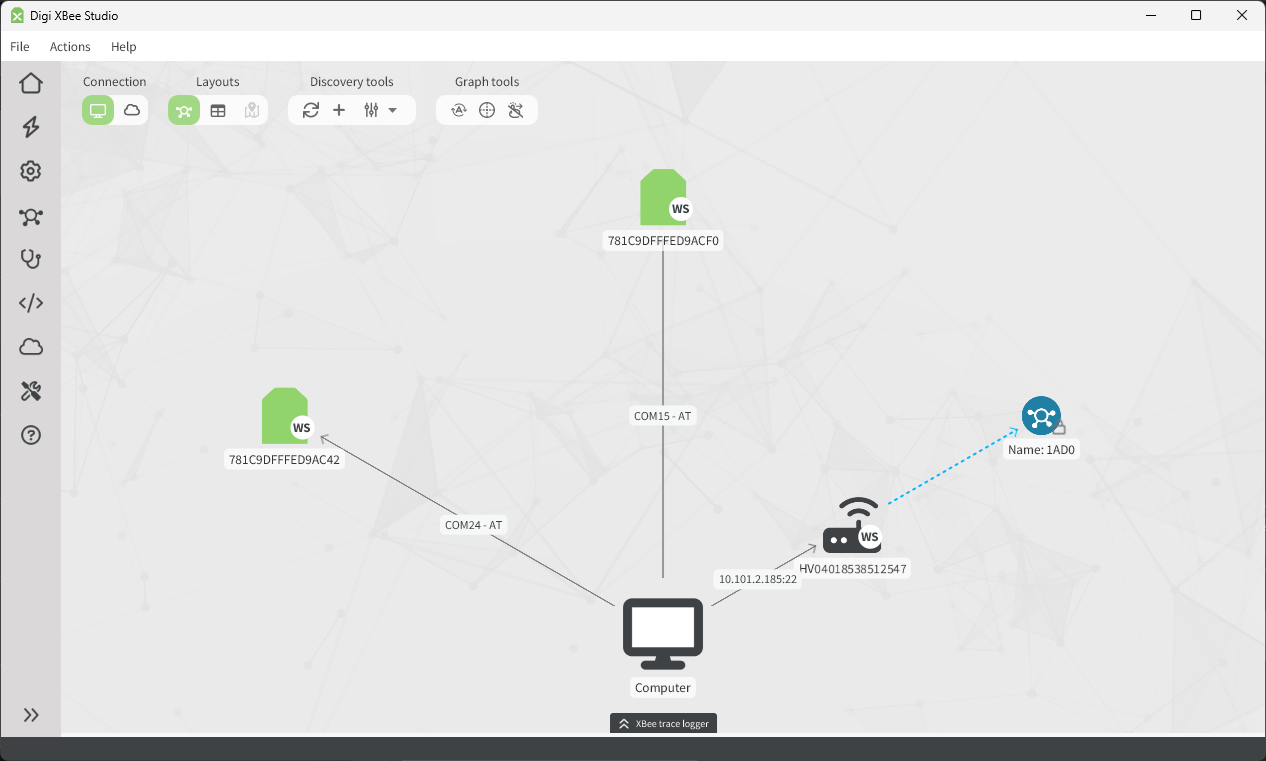
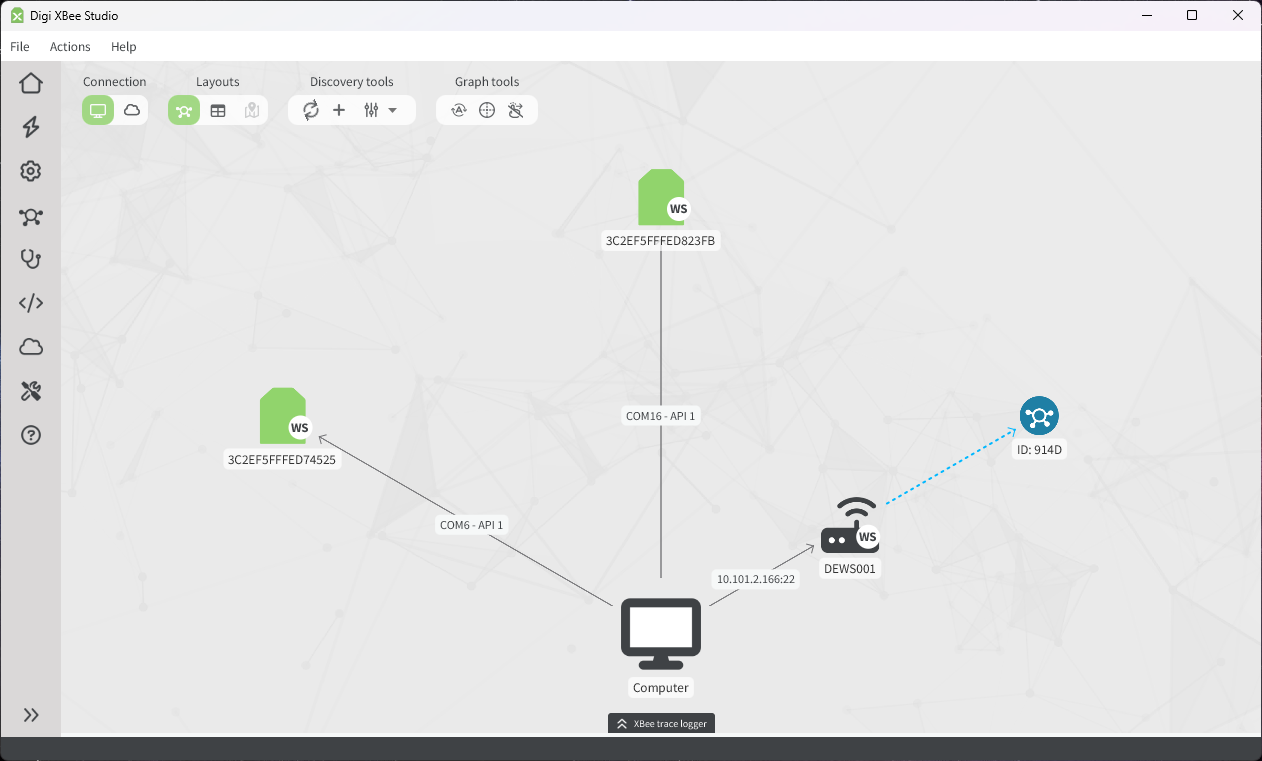
This is expected. When applied, the quick setup enables the Wi-SUN feature in the device. Before running it, the device browser should list all kit devices, similar to:
-
Open the Quick Setup wizard from the left navigation menu (lightning icon, second option).
-
From the list, select the XBee for Wi-SUN Get Started quick setup.
If the XBee for Wi-SUN Get Started quick setup does not appear in the list, wait a moment for XBee Studio to finish synchronizing and downloading the latest quick setups, then try again. -
Click Start. The Quick Setup tab opens.
Interactive help appears the first time you run a quick setup. To prevent it from appearing again, clear the Always show interactive help checkbox in the popup. You can close the help overlay by clicking anywhere on the screen. -
The tab shows discovered devices and two role boxes, Wi-SUN Border Router and Wi-SUN Node:
-
Drag the XBee Hive for Wi-SUN device into the Wi-SUN Border Router box.
-
Drag the XBee for Wi-SUN devices into the Wi-SUN Nodes box.
-
-
Click Next. The Summary page displays.
-
Verify each Wi-SUN Development Kit device is assigned the correct role, then click Start.
-
The Flash page shows the configuration progress for each device. This process may take a while. When all devices are configured, the Test page appears.
-
Close the Quick Setup tab. The device browser now shows your devices as follows:
| Keep all devices connected and powered on for the rest of the Get Started process; subsequent steps build upon this setup. |