

This view allows you to measure the data transfer rate between two XBee devices in the same network.
During the test, XBee Studio sends data packets from the local XBee device to the remote one and waits for them to be echoed back.
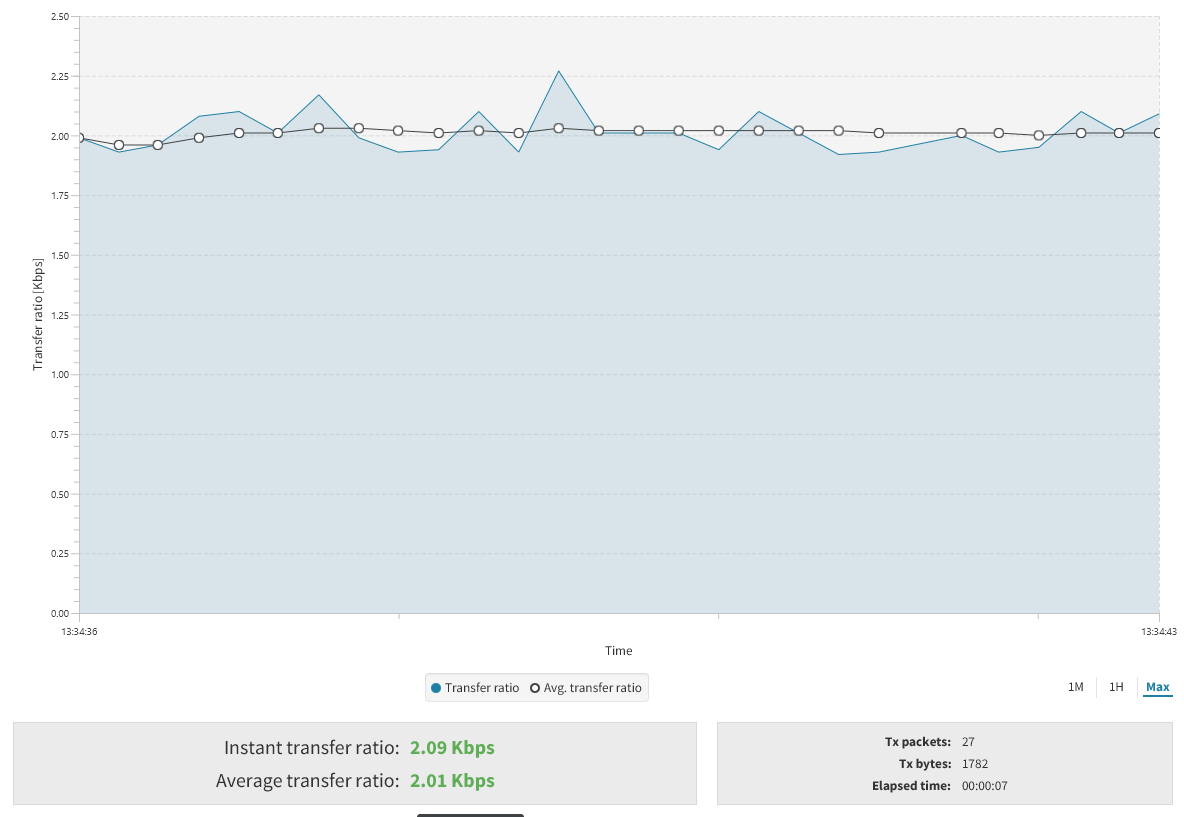
The tool displays both the instantaneous and average transfer rates.
1. Configure the test
-
Open the Throughput test configuration dialog:
-
When you open the throughput test view without a remote device selected, the configuration dialog opens automatically.
-
You can also open it manually using the toolbar button Configure throughput test
 .
.
-
-
Select a remote device from the network:
Module Steps Wi-SUN
-
Enter the IPv6 mesh address of the remote device.
-
Or, if the border router of the network is in XBee Studio as a local device:
-
Select the border router from the list and click Discover remote devices to start a network discovery. Wait for the remote devices to be discovered and added to the list.
-
Select the desired device to perform the test with.
-
Other
-
If no devices are listed, click Discover remote devices to start a network discovery.
Wait for the remote devices to be discovered and added to the list.
-
Select the desired device to perform the test with.
If the local device operates in AT (transparent) mode, you need a secondary device must be connected to your computer and belong to the same network as the local one in order to perform the test. -
-
Optionally, configure the following test options:
Setting Description Throughput test type
Defines the type of throughput test to perform.
Available options include:
-
Unidirectional: Sends data from the local device to the remote device.
Before sending the next data packet, it waits for the transmission status of the previous one.
-
Bidirectional (Cluster ID 0x12): Sends data from the local device to the remote one and waits for the response from the remote device.
The transmission uses explicit addressing frames directed to Cluster ID 0x12, which returns the received message.
Not all protocols and operating modes support this test type. Devices that do not support it display an error at the top of the dialog. -
Bidirectional (Loopback): Similar to the previous mode, this one also waits for the data back from the remote device before sending the next block of data.
The data back is performed using the serial port/USB hardware loopback capabilities.
This method is only valid when the remote device operates in AT (transparent) mode and requires user actions as described in Special considerations.
Packet payload
Sets the data payload to send to the remote device.
Opens a window where you can configure different payload values based on the local device’s operating mode (AT or API).
In API mode, the payload length is limited by the protocol. In AT mode, the payload length is unlimited. Transmit timeout (ms)
Specifies the time the test waits to receive either the transmit status packet (for unidirectional tests) or the response from the remote device (for bidirectional tests).
Larger payloads require longer timeout values.
Test duration
Defines the test duration by time (seconds), number of packets, or indefinitely.
-
2. Run the test
Once a remote device is selected, click Start in the configuration dialog or click the Start throughput test ![]() button in the toolbar.
button in the toolbar.
XBee Studio displays throughput test results in multiple formats:
-
Transfer ratio chart: Displays the instantaneous transfer rate as a light blue area and the average transfer rate as a black line.
The instantaneous transfer rate is calculated every 250ms or after each packet is sent if transmission takes longer than 250ms.
Toggle chart data visibility by selecting or clearing Transfer ratio and Avg. transfer ratio in the legend.
-
Transfer ratio values: Displays instantaneous and average transfer rate values as packets are sent during the test session.
-
Session statistics: Displays overall statistics including the number of packets sent, total bytes transferred, and total session duration.
You can stop the test at any time by clicking the Stop throughput test ![]() button in the toolbar.
button in the toolbar.
Special considerations
There are some special considerations to be aware of while working with the throughput test tool:
-
When the local device operates in AT (transparent) mode, the tool automatically applies the necessary configuration before starting and after finishing the test.
A progress bar indicates this process.
-
The Bidirectional (Loopback) test type works only with remote devices in AT (transparent) operating mode.
-
For Bidirectional (Loopback) tests, connect the loopback jumper or adapter on the remote device before starting the test, and disconnect it after finishing.
A dialog box notifies you when this action is required.
3. Export the test results
When the throughput test finishes, you can export the results in CSV format by clicking the Export throughput test session ![]() button in the toolbar.
button in the toolbar.