

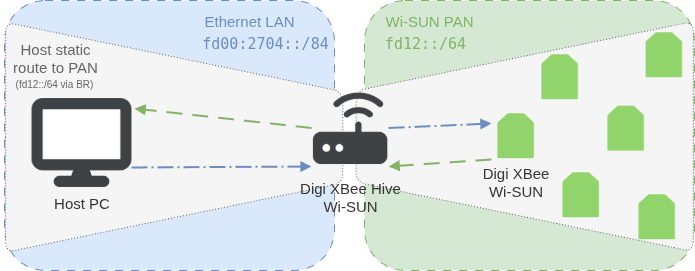
This exercise demonstrates that the XBee Hive Wi-SUN acts as an IPv6 router between the local area network (LAN) and the Wi-SUN mesh (PAN). This routing capability is essential for integrating Wi-SUN nodes into larger networked systems.
At this point, the Wi-SUN network is already formed and functional. IPv6 communication between devices within the PAN has been verified in the previous exercises.
The goal now is to extend connectivity to the host computer and the Wi-SUN nodes through the XBee Hive Wi-SUN. This enables bidirectional communication between the LAN and the PAN.
Follow these steps to configure routing between the host and the Wi-SUN network:
1. Ensure IPv6 connectivity on Ethernet LAN
Ensure that both the host computer and the XBee Hive Wi-SUN have IPv6 connectivity on the Ethernet LAN:
-
The host computer must have an IPv6 address that the XBee Hive Wi-SUN can reach. This address can be statically assigned or obtained via DHCPv6. It must belong to the same subnet or be routable through the Border Router’s Ethernet interface.
-
Likewise, the Border Router must have a reachable IPv6 address on its Ethernet interface, either static or dynamic.
| If your network already provides IPv6 addresses and routes automatically (e.g., through DHCPv6 or SLAAC), you can skip this step. |
Follow these steps to assign static IPv6 addresses and create a static route to the Wi-SUN network:
-
Assign a static IPv6 address to the XBee Hive Wi-SUN. Choose an address such as
fd00:2704::d191:1/64and apply it to the Ethernet interface:-
In XBee Studio, select the Configuration > Settings of the XBee Hive Wi-SUN. The configuration page for your Border Router opens in your default browser.
-
Go to Network > Interfaces > ETH1 > IPv6 > Static address to configure your XBee Hive Wi-SUN static IPv6.
-
Click Enable.
-
In the Address text box, enter the static address to use (for example,
fd00:2704::d191:1/64). -
Click Apply to save the configuration and apply the change.
-
-
Assign a static IPv6 address to the host computer. Use an address in the same subnet, such as
fd00:2704::d191:2/64.Open a PowerShell window with administrator privileges and run:
netsh interface ipv6 add address "<interface_name>" <host_ipv6>Where:
-
<interface_name>is the name of your host interface in the LAN. -
<host_ipv6>is the static IPv6 address to assign.
For example, to assign an address (for instance,
fd00:2704::d191:2/64) to a host interface (such aseth0):PS C:\> netsh interface ipv6 add address "eth0" fd00:2704::d191:2Open a Linux shell terminal and run:
sudo ip -6 addr add <host_ipv6> dev <interface_name>Where:
-
<host_ipv6>is the static IPv6 address to assign. -
<interface_name>is the name of your host interface in the LAN.
For example, to assign an address (for instance,
fd00:2704::d191:2/64) to a host interface (such aseth0):$ sudo ip -6 addr add fd00:2704::d191:2/64 dev eth0Open the Terminal app and run:
sudo ifconfig <interface_name> inet6 <host_ipv6> prefixlen 64Where:
-
<interface_name>is the name of your host interface in the LAN. -
<host_ipv6>is the static IPv6 address to assign.
For example, to assign an address (for instance,
fd00:2704::d191:2/64) to a host interface (such aseth0):% sudo ifconfig eth0 inet6 fd00:2704::d191:2 prefixlen 64 -
-
Verify that the XBee Hive Wi-SUN is reachable from the host.
Use the
pingcommand to send ICMPv6 echo requests and verify connectivity to the Border Routers’s IPv6 address.Open a PowerShell window and run:
ping -6 -n 3 <br_ipv6>Where
<br_ipv6>is the IPv6 address of your XBee Hive Wi-SUN.For example, for a XBee Hive Wi-SUN with IPv6 address of
fd00:2704::d191:1:PS C:\> ping -6 -n 3 fd00:2704::d191:1 Pinging fd00:2704::d191:1 with 32 bytes of data: Reply from fd00:2704::d191:1: time=0.667ms Reply from fd00:2704::d191:1: time=0.575ms Reply from fd00:2704::d191:1: time=0.598ms Ping statistics for fd00:2704::d191:1: Packets: Sent = 3, Received = 3, Lost = 0 (0% loss), Approximate round trip times in milli-seconds: Minimum = 0.575ms, Maximum = 0.667ms, Average = 0.613ms PS C:\>Open a Linux shell terminal and run:
ping6 -c 3 <br_ipv6>Where
<br_ipv6>is the IPv6 address of your XBee Hive Wi-SUN.For example, for a XBee Hive Wi-SUN with IPv6 address of
fd00:2704::d191:1:$ ping6 -c 3 fd00:2704::d191:1 PING fd00:2704::d191:1(fd00:2704::d191:1) 56 data bytes 64 bytes from fd00:2704::d191:1: icmp_seq=1 ttl=64 time=0.677 ms 64 bytes from fd00:2704::d191:1: icmp_seq=2 ttl=64 time=0.585 ms 64 bytes from fd00:2704::d191:1: icmp_seq=3 ttl=64 time=0.623 ms --- fd00:2704::d191:1 ping statistics --- 3 packets transmitted, 3 received, 0% packet loss, time 2025ms rtt min/avg/max/mdev = 0.585/0.628/0.677/0.037 ms $On some systems, ping6may be aliased topingor unavailable. If you encounter an error, try usingping -6instead.Open the Terminal app and run:
ping6 -c 3 <br_ipv6>Where
<br_ipv6>is the IPv6 address of your XBee Hive Wi-SUN.For example, for a XBee Hive Wi-SUN with IPv6 address of
fd00:2704::d191:1:% ping6 -c 3 fd00:2704::d191:1 PING6(56=40+8+8 bytes) fd00:2704::d191:2 --> fd00:2704::d191:1 16 bytes from fd00:2704::d191:1, icmp_seq=0 hlim=64 time=0.623 ms 16 bytes from fd00:2704::d191:1, icmp_seq=1 hlim=64 time=0.602 ms 16 bytes from fd00:2704::d191:1, icmp_seq=2 hlim=64 time=0.594 ms --- fd00:2704::d191:1 ping6 statistics --- 3 packets transmitted, 3 packets received, 0.0% packet loss round-trip min/avg/max/std-dev = 0.594/0.606/0.623/0.012 ms %
2. Add a static route to the Wi-SUN subnet
To allow the host to reach the nodes in the Wi-SUN network through the XBee Hive Wi-SUN, add a static route to the PAN subnet (fd12::/64).
This route tells the host to forward packets for the PAN to the Border Router.
Open a PowerShell window with administrator privileges and run:
netsh interface ipv6 add route fd12::/64 "<interface_name>" <br_ipv6>Where:
-
<interface_name>is the name of your host interface in the LAN. -
<br_ipv6>is the IPv6 address of your XBee Hive Wi-SUN.
For example, for a XBee Hive Wi-SUN with IPv6 address of fd00:2704::d191:1 and a host interface such as eth0:
PS C:\> netsh interface ipv6 add route fd12::/64 "eth0" fd00:2704::d191:1Open a Linux shell terminal and run:
sudo ip -6 route add fd12::/64 via <br_ipv6> dev <interface_name>Where:
-
<br_ipv6>is the IPv6 address of your XBee Hive Wi-SUN. -
<interface_name>is the name of your host interface in the LAN.
For example, for a XBee Hive Wi-SUN with IPv6 address of fd00:2704::d191:1 and a host interface such as eth0:
$ sudo ip -6 route add fd12::/64 via fd00:2704::d191:1 dev eth0Open the Terminal app and run:
sudo route -n add -inet6 fd12::/64 <host_ipv6>Where <host_ipv6> is the IPv6 address of your XBee Hive Wi-SUN.
For example, for a XBee Hive Wi-SUN with IPv6 address of fd00:2704::d191:1:
% sudo route -n add -inet6 fd12::/64 fd00:2704::d191:13. Verify communication between the host and the Wi-SUN PAN
Once the host and the XBee Hive Wi-SUN are properly configured, verify that the host can communicate with devices in the Wi-SUN mesh, and vice versa, ensuring bidirectional connectivity.
3.1. From a Wi-SUN node to the host
In the XBee Console of one of your XBee Wi-SUN modules in XBee Studio, execute a ping to your host IPv6.
-
Connect the console and type the escape sequence
+++to receive anOK. -
Execute the ping command,
ATPG, followed by the IPv6 of your host computer, for examplefd00:2704::d191:2. -
The result is the round trip time in milliseconds.
      +++OK

      ATPG fd00:2704::d191:2

      57
3.2. From the host to a Wi-SUN node
-
Get the IPv6 address of one of your XBee Wi-SUN modules in the network:
-
In XBee Studio, right-click on the XBee Wi-SUN module tab.
-
Select Copy > Mesh IPv6 from the context menu.
-
-
Use a host terminal to send an ICMPv6 echo request (ping) to a node’s IPv6 address:
Open a PowerShell window and run:
ping -6 -n 3 <node_ipv6>Where
<node_ipv6>is the copied XBee Wi-SUN module IPv6 address.For example, for a XBee Wi-SUN module with IPv6 of
fd12::4fb9:PS C:\> ping -6 -n 3 fd12::4fb9 Pinging fd12::4fb9 with 32 bytes of data: Reply from fd12::4fb9: time=244ms Reply from fd12::4fb9: time=262ms Reply from fd12::4fb9: time=286ms Ping statistics for fd12::4fb9: Packets: Sent = 3, Received = 3, Lost = 0 (0% loss), Approximate round trip times in milli-seconds: Minimum = 244ms, Maximum = 286ms, Average = 264ms PS C:\>Open a Linux shell terminal and run:
ping6 -c 3 <node_ipv6>Where
<node_ipv6>is the copied XBee Wi-SUN module IPv6 address.For example, for a XBee Wi-SUN module with IPv6 of
fd12::4fb9:$ ping6 -c 3 fd12::4fb9 PING fd12::4fb9(fd12::4fb9) 56 data bytes 64 bytes from fd12::4fb9: icmp_seq=1 ttl=62 time=124 ms 64 bytes from fd12::4fb9: icmp_seq=2 ttl=62 time=99.1 ms 64 bytes from fd12::4fb9: icmp_seq=3 ttl=62 time=103 ms --- fd12::4fb9 ping statistics --- 3 packets transmitted, 3 received, 0% packet loss, time 2002ms rtt min/avg/max/mdev = 99.089/108.775/124.268/11.068 ms $On some systems, ping6may be aliased topingor unavailable. If you encounter an error, try usingping -6instead.Open the Terminal app and run:
ping6 -c 3 <node_ipv6>Where
<node_ipv6>is the copied XBee Wi-SUN module IPv6 address.For example, for a XBee Wi-SUN module with IPv6 of
fd12::4fb9:% ping6 -c 3 fd12::4fb9 PING6(56=40+8+8 bytes) fd00:2704::d191:2 --> fd12::4fb9 16 bytes from fd12::4fb9, icmp_seq=0 hlim=64 time=158 ms 16 bytes from fd12::4fb9, icmp_seq=1 hlim=64 time=150 ms 16 bytes from fd12::4fb9, icmp_seq=2 hlim=64 time=186 ms --- fd12::4fb9 ping6 statistics --- 3 packets transmitted, 3 packets received, 0.0% packet loss round-trip min/avg/max/std-dev = 150.397/164.700/185.920/15.304 ms %You should see ICMPv6 echo replies, confirming that packets are successfully routed through the Border Router into the Wi-SUN mesh.
4. Restore routing and address configuration
Follow these instructions to return your system to its initial state by removing the static route and IPv6 addresses configured during this exercise.
4.1. Remove the static route to the Wi-SUN subnet
The static route to the fd12::/64 subnet enabled your host to reach the Wi-SUN network via the XBee Hive Wi-SUN. Now that the exercise is complete, you can safely remove this route.
Open a PowerShell window with administrator privileges and run:
netsh interface ipv6 delete route fd12::/64 "<interface_name>" <br_ipv6>Where:
-
<interface_name>is the name of your host interface in the LAN. -
<br_ipv6>is the IPv6 address of your XBee Hive Wi-SUN.
For example, for a XBee Hive Wi-SUN with IPv6 address of fd00:2704::d191:1 and a host interface such as eth0:
PS C:\> netsh interface ipv6 delete route fd12::/64 "eth0" fd00:2704::d191:1Open a Linux shell terminal and run:
sudo ip -6 route del fd12::/64 via <br_ipv6> dev <interface_name>Where:
-
<br_ipv6>is the IPv6 address of your XBee Hive Wi-SUN. -
<interface_name>is the name of your host interface in the LAN.
For example, for a XBee Hive Wi-SUN with IPv6 address of fd00:2704::d191:1 and a host interface such as eth0:
$ sudo ip -6 route del fd12::/64 via fd00:2704::d191:1 dev eth0Open the Terminal app and run:
sudo route -n delete -inet6 fd12::/64 <host_ipv6>Where <host_ipv6> is the IPv6 address of your XBee Hive Wi-SUN.
For example, for a XBee Hive Wi-SUN with IPv6 address of fd00:2704::d191:1:
% sudo route -n delete -inet6 fd12::/64 fd00:2704::d191:14.2. Remove static IPv6 addresses
If you assigned static IPv6 addresses to your XBee Hive Wi-SUN and your host to perform this exercise, restore your network settings to their previous state.
-
Remove the static IPv6 address from the XBee Hive Wi-SUN:
-
In XBee Studio, select the Configuration > Settings of the XBee Hive Wi-SUN. The configuration page for your Border Router opens in your default browser.
-
Go to Network > Interfaces > ETH1 > IPv6 > Static address to edit the static IPv6 of the XBee Hive Wi-SUN.
-
In the Address text box, remove the static address and leave the box empty.
-
Click Enable to disable this feature.
-
Click Apply to save the configuration and apply the change.
-
-
Remove the static IPv6 address from the host:
Open a PowerShell window with administrator privileges and run the following commands:
netsh interface ipv6 delete address "<interface_name>" <host_ipv6>Where:
-
<interface_name>is the name of your host interface in the LAN. -
<host_ipv6>is the static IPv6 address of your host.
For example, to remove the host IPv6
fd00:2704::d191:2/64of an interface namedeth0:PS C:\> netsh interface ipv6 delete address "eth0" fd00:2704::d191:2Open a Linux shell terminal and run:
sudo ip -6 addr del <host_ipv6>/64 dev <interface_name>Where:
-
<host_ipv6>is the static IPv6 address of your host. -
<interface_name>is the name of your host interface in the LAN.
For example, to remove the host IPv6
fd00:2704::d191:2/64of an interface namedeth0:$ sudo ip -6 addr del fd00:2704::d191:2/64 dev eth0Open the Terminal app and run:
sudo ifconfig <interface_name> inet6 <host_ipv6> -aliasWhere:
-
<interface_name>is the name of your host interface in the LAN. -
<host_ipv6>is the static IPv6 address of your host.
For example, to remove the host IPv6
fd00:2704::d191:2/64of an interface namedeth0:% sudo ifconfig eth0 inet6 fd00:2704::d191:2 -alias -
5. Summary
This exercise confirms that the XBee Hive Wi-SUN enables transparent IPv6 routing between the LAN and the Wi-SUN PAN. With this communication path in place, Wi-SUN nodes appear as regular IPv6 devices from the LAN’s perspective. This allows host systems and applications to reach the nodes directly, without protocol translation or gateways.
It enables diagnostics, configuration, data exchange, and integration with backend services. This routing path also supports more advanced topologies and opens the way to bridging the mesh with cloud platforms or remote infrastructure.
In addition to basic IPv6 routing, the XBee Hive Wi-SUN also supports advanced network functions such as NAT64 and DNS64. These features allow IPv6-only Wi-SUN nodes to communicate with IPv4 services by translating addresses and DNS queries, extending interoperability beyond the local network.
This capability is particularly useful in scenarios where the Wi-SUN mesh needs to access external cloud platforms, legacy IPv4-based infrastructure, or public APIs without requiring protocol translation at the application level.