

Digi ConnectCore Security Services allow you to scan your firmware SBOM (Software Bill of Materials) for vulnerabilities after your firmware has been released or deployed, using Digi Remote Manager. This enables ongoing detection and remediation of security issues throughout your device’s lifecycle, helping ensure your devices remain protected against newly discovered threats.
| This workflow is designed for teams who want to monitor production firmware images for vulnerabilities, by uploading their firmware and SBOM packages to Digi Remote Manager and performing CVE scans through its web interface. |
By following the process below, you can upload your firmware and SBOM packages, perform CVE scans, and review detailed security reports to help ensure your device remains protected throughout its lifecycle. To do so, follow these steps:
1. Create the update package
To learn how to create the update package (.swu), see Build a software update package.
2. Create the SBOM manifest package
-
Inherit the
ccss.bbclassin your project’sconf/local.confconfiguration file to enable SBOM generation in Digi Embedded Yocto.conf/local.confINHERIT += "ccss" -
Build the image. For example,
dey-image-webkit:$ bitbake dey-image-webkitExpect a slight increase in build time due to additional dependencies and tasks for SBOM generation.
Digi Embedded Yocto creates an SBOM manifest package for any image recipe you build within your project, including ramdisk images.
Find the SBOM manifest packages in your project’s root directory (not in the DEPLOYDIR) with the name CCSS_<image-name>-<timestamp>.zip.
Generate SBOM only for specific image (optional)
To have Digi Embedded Yocto only generate an SBOM for specific image recipes instead of for all image recipes, use the CCSS_ENABLE variable as in the following example:
INHERIT += "ccss"

# Disable global SBOM generation
CCSS_ENABLE = "0"

# Enable SBOM generation only for 'dey-image-qt' and 'dey-image-webkit' images
CCSS_ENABLE:pn-dey-image-qt = "1"
CCSS_ENABLE:pn-dey-image-webkit = "1"
3. Upload the packages to Remote Manager firmware repository
Custom update packages must be stored in the Digi Remote Manager firmware repository. Once your packages are in the repository, you can use them in Automations and Templates, as well as monitor and analyze them to look for CVE vulnerabilities if you have a subscription to Digi ConnectCore Security Services.
| Each user can store up to 10 GB of custom firmware. After reaching this limit, you cannot upload custom firmware until you delete package(s). If you need more space, please contact a Digi representative. |
Remote Manager repository is accessible using Remote Manager web service APIs and can be managed using:
See ConnectCore Cloud Services web services for more information on how to use web service APIs.
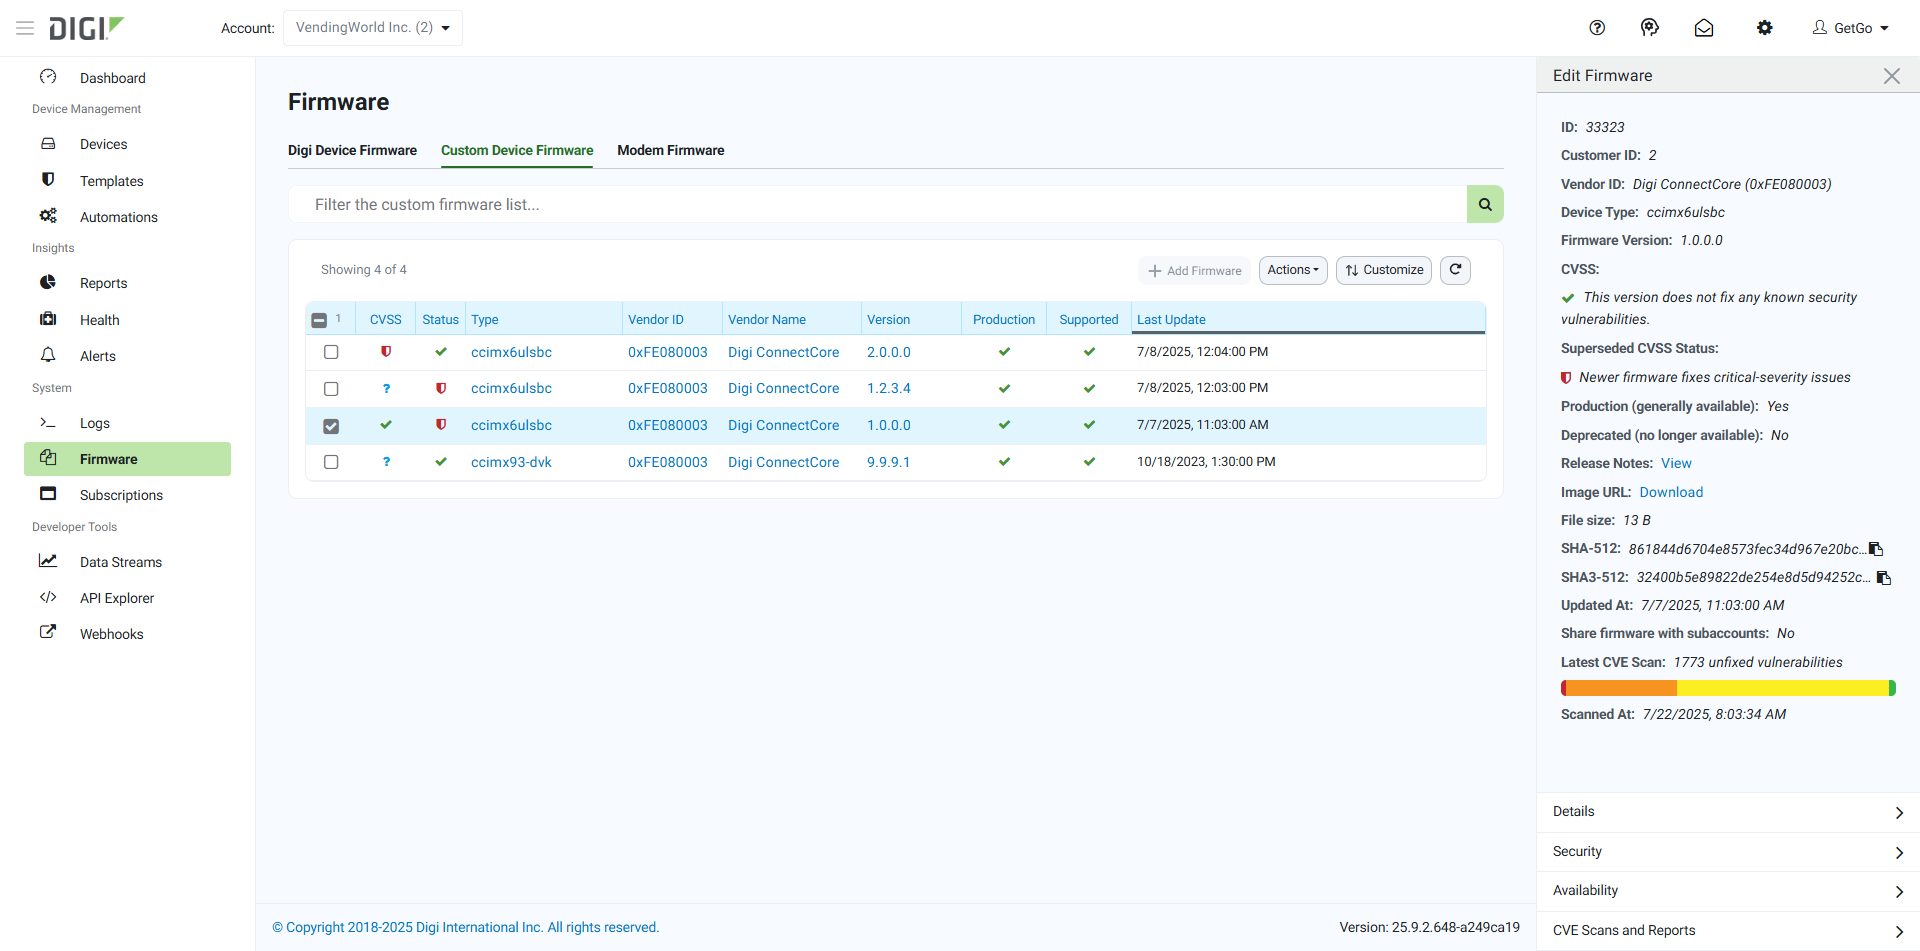
Firmware page
You can access Remote Manager firmware repository from the web interface and upload your devices firmware:
-
Log in to your Remote Manager account (https://remotemanager.digi.com).
-
Select System > Firmware on the left bar.
-
Go to the Custom Device Firmware tab.
-
Click the Add Firmware button to open the wizard.
-
Fill the fields to identify this firmware in the repository.
Step 1: Details
-
Select the Vendor ID called Digi ConnectCore (0xFE080003).
-
Choose the Device Type of the devices you are going to update with this firmware. See Device type setting.
-
Enter the Firmware Version of this package.
-
Type the URL of the firmware Release Notes.
-
Click Add files and select your update package (
.swu) from your local file system. -
Click Continue.
Step 2: Security
-
If you have a subscription to Digi ConnectCore Security Services, you can enable the SBOM CVE Analysis and Monitoring option to scan your firmware for vulnerabilities and get CVE reports:
-
Choose the SBOM Scan Frequency, which is how often the firmware should be scanned for vulnerabilities. If you don’t want to scan it periodically, choose Manual.
-
Choose whether you want to receive email notifications when scans are completed by enabling the Email Notification for CVE Scans option.
-
Click Add file and select the SBOM manifest package (
.zip) from your local file system.
-
-
Otherwise, select the CVSS option that best describes this firmware. Choose the CVSS score of the most severe vulnerability fixed by this firmware version.
-
Click Continue.
Step 3: Availability
-
Choose if this firmware is Production ready or not.
-
Choose if this firmware is Deprecated or not.
-
If your Digi Remote Manager account has any subaccounts, choose whether this firmware is available for all subaccounts, some of them, or only for the current account.
-
Click Create to upload your package to Remote Manager firmware repository. When the upload process finishes, a new entry in the table is added.
For extended Remote Manager web interface usage and reference information, see the Digi Remote Manager User Guide.
API Explorer and third party tools
You can use third-party tools or the API Explorer with v1/firmware API to create, list, update or remove custom firmware:
-
Create a new custom firmware using
curltool.$ curl \ -X POST \ -u 'username:password' \ -H X-Pretty:true \ -H Content-Type:application/octet-stream \ -F "image=@/path/to/the/swu/package/dey-image-webkit-swu-ccmp25-dvk_5.0.4.2.swu" \ 'https://remotemanager.digi.com/ws/v1/firmware/inventory/FE080003/ccmp25-dvk?firmware_version=5.0.4.2&information_link=https://www.mywebsite.com/my_release_notes&security_related=none&production=true&deprecated=false&filename=dey-image-webkit-swu-ccmp25-dvk_5.0.4.2.swu'Where:
-
usernameis your account username. -
passwordis your account password. -
/path/to/the/swu/package/dey-image-webkit-swu-ccmp25-dvk_5.0.4.2.swuis the absolute path to the firmware file in your development machine.
The answer is similar to the following:
{
  "location" : "https://remotemanager.digi.com/ws/v1/firmware/image/343236313933373135350a6363696d7839332d64766b0a36373130393633340a0a0a0a313639353338313831333134320a31383531",
  "vendor_id" : 4261937155,
  "type" : "ccmp25-dvk",
  "firmware_version" : "5.0.4.2",
  "file_size" : 204946944,
  "production" : true,
  "deprecated" : false,
  "filename" : "dey-image-webkit-swu-ccmp25-dvk_5.0.4.2.swu",
  "information_link" : "https://www.mywebsite.com/my_release_notes",
  "security_related" : "none",
  "sha_512" : "ec6f103e782c22eb160a159656f72b267a46fd016c63dbeca9425bbf331e766337150cc1aa5c4c6ca6aef5a640071f2da31647e92d463b3ab0110cc17257dca6",
  "sha3_512" : "9cb55e244baa3ea25e3781c16c3300b34f1a2be0de95c2d2ea36385f4d42f91d4ba3252e2d6e18ef648fa09881e3698fc04ff916b0def626e7218bc9d21393e7",
  "firmware_status" : "not_identified",
  "customer_id" : XXXX
}
Where
XXXXis your customer id.The Get Started with ConnectCore Cloud Services demo web application, used in the Get started guide, uploads new firmware to Remote Manager firmware repository. See method
list_repository()indrm_requests.pycalled when Update firmware button in Management page is clicked. -
-
List available custom device firmwares from API Explorer:
-
Log in to your Remote Manager account (https://remotemanager.digi.com).
-
Go to the System > API Explorer tab.
-
Click the Examples combo.
-
Select v1/firmware > List all custom device firmware.
-
Click Send.
In the Response, an entry corresponding to the new created firmware is listed:
{
  "count": 1,
  "size": 1000,
  "list": [
    {
      "id": 481677,
      "deprecated": false,
      "file_size": 204946944,
      "filename": "dey-image-webkit-swu-ccmp25-dvk_5.0.4.2.swu",
      "firmware_status": "not_identified",
      "firmware_version": "5.0.4.2",
      "information_link": "https://www.mywebsite.com/my_release_notes",
      "location": "https://firmware.devicecloud.com/device_firmware/ccmp25-dvk/5.0.4.2/dey-image-webkit-swu-ccmp25-dvk_5.0.4.2.swu",
      "production": true,
      "security_related": "none",
      "sha_512": "ec6f103e782c22eb160a159656f72b267a46fd016c63dbeca9425bbf331e766337150cc1aa5c4c6ca6aef5a640071f2da31647e92d463b3ab0110cc17257dca6",
      "sha3_512": "9cb55e244baa3ea25e3781c16c3300b34f1a2be0de95c2d2ea36385f4d42f91d4ba3252e2d6e18ef648fa09881e3698fc04ff916b0def626e7218bc9d21393e7",
      "type": "ccmp25-dvk",
      "vendor_id": 4261937155,
      "vendor_name": "Digi ConnectCore",
      "update_time": "2023-09-22T11:24:00.000Z",
      "customer_id": XXXX
    }
  ]
}
Where
XXXXis your customer id.
The Get Started with ConnectCore Cloud Services demo web application, used in the Get started guide, lists existing firmware versions in Remote Manager firmware repository. See method
list_repository()indrm_requests.pycalled when Refresh button in Download from firmware repository tab of Management page is clicked. -
| You can use your preferred programming language to perform the update of your connected devices. See ConnectCore Cloud Services web services for more information. |
4. Scan the firmware SBOM and view the CVE report
Once the firmware and SBOM manifest packages are in the Remote Manager repository, you can scan the firmware for CVE vulnerabilities and view the report:
-
Log in to your Remote Manager account (https://remotemanager.digi.com).
-
Select System > Firmware on the left bar.
-
Go to the Custom Device Firmware tab.
-
Select the firmware you want to scan from the table.
-
Click the CVE Scans and Reports tab on the right panel.
-
Click the Scan Firmware button to start the scan. The scan process may take several minutes. Once the scan is complete, the scan entry updates in the table with the scan date, status, and number of issues found.
Depending on your subscription to Digi ConnectCore Security Services, you may have a limited number of scans available per subscription period. You can check your subscription details and remaining scans in the System > Subscriptions section of Digi Remote Manager. -
Click the scan entry to view the detailed CVE report. The report contains two tabs:
-
Summary: Shows an overview of the scan results, including the total number of issues found and their severity distribution.
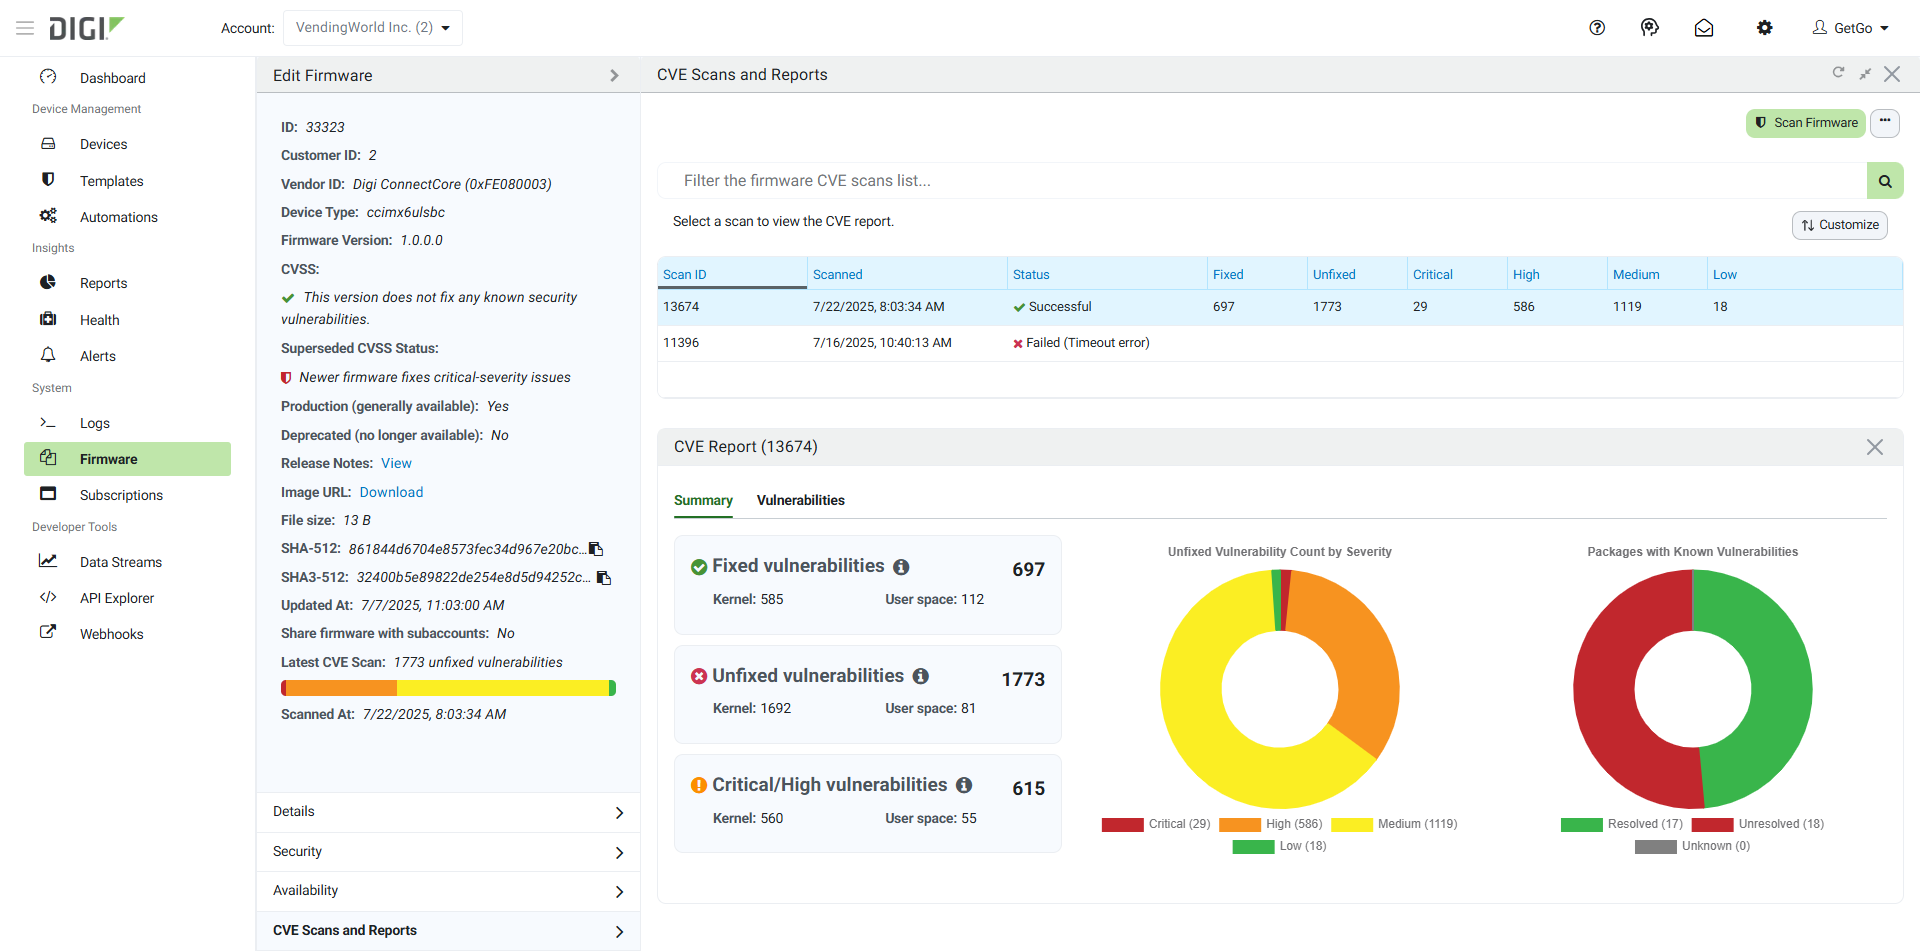
-
Vulnerabilities: Lists all identified packages with known vulnerabilities, including details such as CVE ID, severity, status, and attack vector. You can click on the CVE ID for each vulnerability to view more details in the NIST National Vulnerability Database. Use the table filters to narrow down the list based on severity, status, or other criteria.

-
-
(Optional) To download the report as PDF, click the ··· button at the top right of the page and select Download CVE Report as PDF.
To investigate and manage individual vulnerabilities, continue to Triage and manage vulnerabilities.
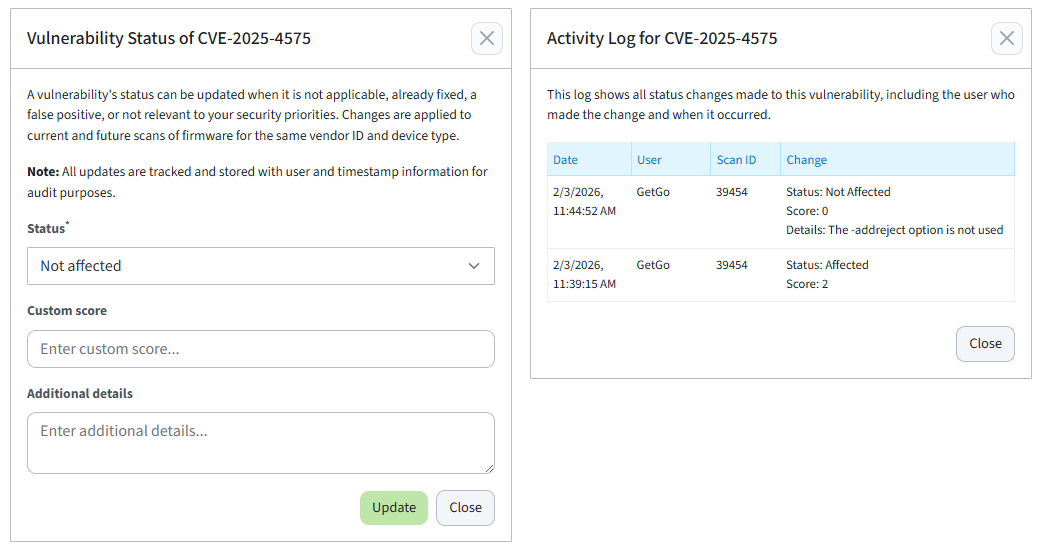
5. Triage and manage vulnerabilities
After reviewing the CVE report, the next step is to prioritize and investigate the discovered vulnerabilities. This process, known as triage, helps you focus on the issues that are most relevant to your product and organization.
The Vulnerabilities tab allows you to manage each vulnerability individually. When you select a vulnerability from the table, two actions become available: Change status and score and View activity log.
Change status and score
As you investigate each vulnerability, you can record your findings by updating its status and assigning a custom score. This helps your team track progress, document decisions, and prioritize remediation efforts based on your organization’s specific risk criteria.
This action opens a dialog that allows you to:
-
Set the vulnerability Status to one of the following values:
-
Fixed: The security issue has been addressed and resolved.
-
Resolved with Pedigree: The security issue has been addressed, and the fix is backed by documented evidence such as commit history or code diffs.
-
Affected: Your product may be susceptible to this vulnerability, either directly or through dependent components.
-
In triage: The vulnerability is under review to assess its relevance and potential impact.
-
False Positive: The vulnerability was incorrectly matched to this component and does not actually apply.
-
Not Affected: This vulnerability does not impact your product. Consider adding a justification to document the reasoning.
-
-
Assign a Custom Score (0.0 to 10.0) based on your organization’s internal risk assessment metrics. This allows you to prioritize vulnerabilities according to your specific security requirements.
-
Add Additional Details with notes or justification for the status change.
Status and score changes apply to the current scan and all future scans, but not to previously completed scans. These settings apply to any SBOM with the same vendor ID and device type.
| All vulnerability status changes are tracked and stored with user information and timestamps for audit purposes. This allows your organization to maintain a complete audit trail of security decisions. |
View activity log
This action opens a dialog showing the complete history of changes made to that vulnerability, including who made each change, when, and what was modified.
For information about scanning development firmware automatically (CI/CD), see Analyze development firmware (CI/CD).
