

Provision your ConnectCore device in Digi Remote Manager to enable cloud-based management, monitoring, and control. Registering your device is essential to access all ConnectCore Cloud Services features, including remote configuration, firmware updates, and real-time insights.
Use one of the following methods to provision your device:
-
ConnectCore Quick Setup mobile application - Quickly provision devices using an intuitive mobile interface.
-
Digi IoT Mobile SDK - Integrate provisioning capabilities into your mobile applications using Digi’s SDK.
-
Digi Remote Manager UI - Provision devices using the web interface.
-
Digi Remote Manager APIs - Programmatically provision devices using REST APIs.
| If you already have a Digi Remote Manager account, you must accept the Digi OEM ConnectCore Cloud Services Terms of Service before you register your first ConnectCore 8X SOM. |
ConnectCore Quick Setup mobile application
The Digi ConnectCore Quick Setup mobile application guides you through the provisioning process.
Step 1: Install the ConnectCore Quick Setup application
-
Install the Digi ConnectCore Quick Setup app in your smartphone. You can find it in both the Google Play Store and the Apple App Store:


Step 2: Launch provisioning
-
Open the ConnectCore Quick Setup application.
-
Tap Provision devices on the home page.
-
Enter your Digi Remote Manager credentials when prompted.
Step 3: Add devices to provision
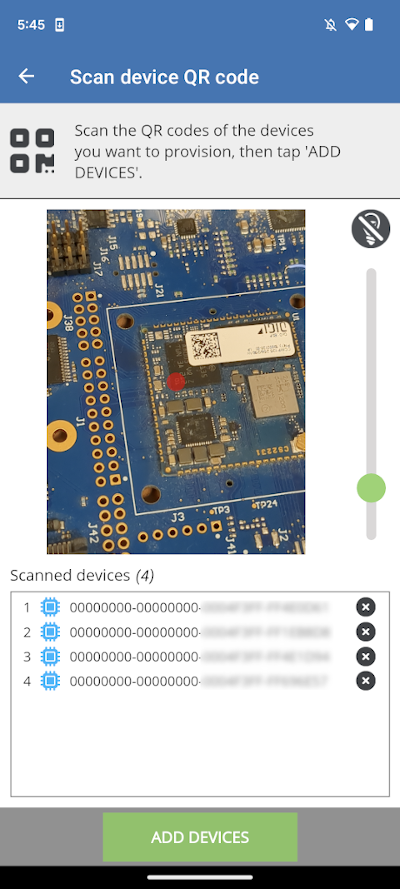
After logging in, an empty list of devices appears. Tap Add devices to choose how to add devices:
Scan Data Matrix code
-
Open the Data Matrix code scanner.
-
Adjust camera settings, such as zoom and torch light.
-
Point the camera at the device’s Data Matrix code.
-
Scan the Data Matrix code.
If the Data Matrix code is obscured by the heat sink, you can also display the code on the serial console of the device by running:
# sysinfo -
Upon scanning:
-
The device vibrates and emits a sound.
-
A popup dialog confirms the scanned device.
-
The device is added to the list.
-
-
Tap Add devices to move scanned devices to the provisioning list.
Enter device information manually
-
Open the manual entry screen.
-
Enter:
-
Device MAC Address
-
Install Code (Optional) - 12-digit device serial number.
-
-
Tap Add device to add it to the list.
Load devices from file
-
Select a CSV file from your device storage.
-
Ensure the file follows this format:
<DEVICE_ID_1>,<INSTALL_CODE_1> <DEVICE_ID_2>,<INSTALL_CODE_2> ... <DEVICE_ID_N>,<INSTALL_CODE_N> -
Load the file to populate the device list.
Step 4: Provision devices
-
Tap Provision devices to register them in your Digi Remote Manager account.
-
Optionally:
-
Save the list by tapping Save.
-
Clear the list by tapping Clear.
-
| If provisioning fails, a popup displays failed devices and error messages. Successfully provisioned devices are removed from the list, while failed ones remain for further attempts. |
Digi IoT Mobile SDK
Use the Digi IoT Mobile SDK to provision devices from a custom mobile application.
Key features
-
Seamless integration with Digi Remote Manager.
-
Secure device provisioning.
Get started
-
Refer to the Digi IoT mobile SDK documentation for setup instructions.
-
Review the Digi Mobile SDK API reference for provisioning API details.
-
Implement the necessary API calls in your application.
Digi Remote Manager UI
Before you can monitor and manage your device, you must add it to your Remote Manager account. To do so:
-
Log in to your Remote Manager account (https://remotemanager.digi.com).
-
Select Devices on the left navigation bar to display a list of the devices registered in your account.
-
Click Register Devices. The Register Devices dialog appears.
-
Write the Ethernet MAC address of your device.
You can find the Ethernet MAC address on the front white label of the device. For ConnectCore 8X SBC Pro, use the ETH MAC value on the label plus one, e.g.: For ETH MAC: 00419E98A636, use 00419E98A637. -
Click Register Device to register the device to your account. A new entry for your device appears in your device inventory.
For more information, refer to the Digi Remote Manager User Guide.
Digi Remote Manager APIs
Follow these steps to provision devices programmatically using Digi Remote Manager REST APIs.
Step 1: Prepare the authentication header
Obtain an authentication token from Digi Remote Manager before making any requests. Use either Basic Authentication (username and password) or API Keys.
For Basic Authentication, include the Authorization header with your credentials encoded in Base64:
Authorization: Basic <base64-encoded-credentials>For API Keys authentication, create an API key in your Digi Remote Manager account and include the X-API-KEY-ID and X-API-KEY-SECRET headers:
X-API-KEY-ID: <your-api-key-id>
X-API-KEY-SECRET: <your-api-key-secret>
Step 2: Prepare the request body
Create a JSON object that lists the device or devices you want to provision. The request body must follow this format:
{
  "devices": [
    {
      "mac": "0004F3XXXXXX",
      "install_code": "123456789012"
    },
    {
      "mac": "0004F3YYYYYY",
      "install_code": "123456789012"
    }
  ]
}
Each device object must include the mac field with the device’s MAC address.
The install_code field is only needed if the device requires an install code for provisioning, which matches the default device password.
| For more information on the available fields, refer to Digi Remote Manager API Reference |
Step 3: Send the provisioning request
Set up the request by configuring the authentication header and request body. Then, send an HTTP POST request to Digi Remote Manager using the following endpoint:
POST https://remotemanager.digi.com/ws/v1/devicesStep 4: Handle the response
Review the response to verify the provisioning results. The response contains a list of devices and their provisioning status following this format:
{
    "count": 2,
    "list": [
        {
            "error_status": 403,
            "error_message": "Invalid access to data - it is not owned by this customer.",
            "error_context": {
                "customer_id": 352,
                "id": "00000000-00000000-0004F3FF-FFXXXXXX",
                "mac": "0004F3XXXXXX",
                "in_maintenance_window": "yes",
                "authenticated_connection": false
            }
        },
        {
            "channels_uri": "/ws/v1/devices/channels/00000000-00000000-0004F3FF-FFYYYYYY",
            "metrics_uri": "/ws/v1/devices/metrics/00000000-00000000-0004F3FF-FFYYYYYY",
            "customer_id": 352,
            "type": " ",
            "connection_status": "disconnected",
            "id": "00000000-00000000-0004F3FF-FFYYYYYY",
            "mac": "0004F3YYYYYY",
            "restricted_status": "unrestricted",
            "maintenance_mode": "off",
            "firmware_status": "not_identified",
            "health_status": "unknown",
            "in_maintenance_window": "yes",
            "authenticated_connection": false,
            "management_uri": "/ws/v1/devices/management/00000000-00000000-0004F3FF-FFYYYYYY"
        }
    ]
}