

In this section you will learn how to create a very basic application that connects to a Digi IoT device via Bluetooth Low Energy.
The application tries to open the communication with the device over Bluetooth Low Energy. If it succeeds, the application displays a message indicating that the connection with the device was successful. Otherwise, it displays a message followed by the error that occurred.
Follow these steps to create the application:
1. Create the .NET MAUI project
-
Open Visual Studio.
-
Choose the File > New > Project… option from the main menu or the Create a new project option if you are in the Visual Studio welcome page.
-
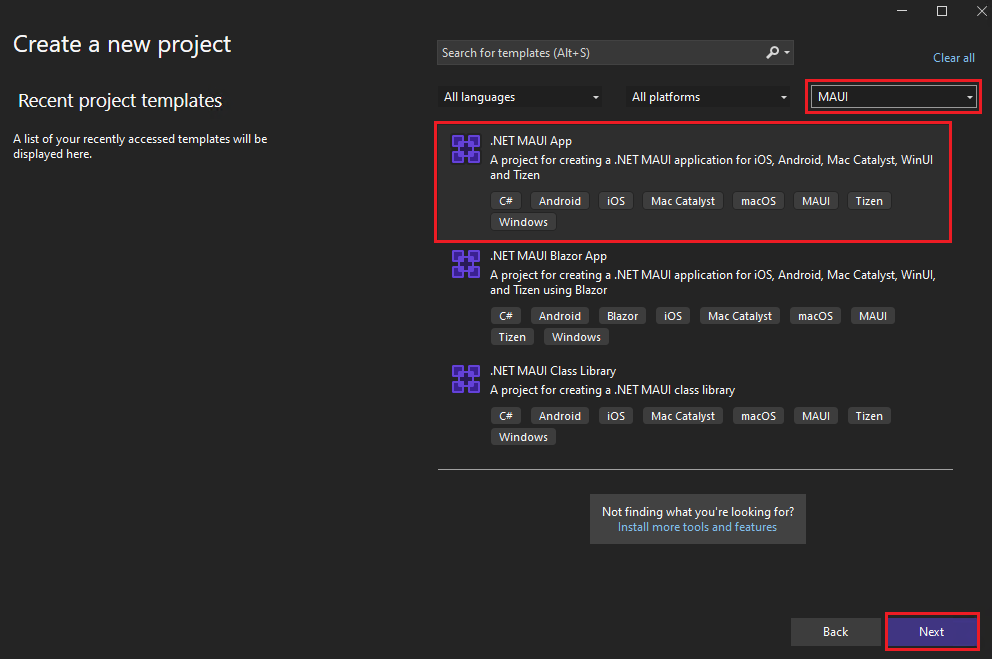
In the Create a new project window, select MAUI from the All project types drop-down, select the .NET MAUI App template, and then click Next.
-
In the Configure your new project window, enter a project name: "MyDigiIoTMAUIApp", for example. Choose the location for the project and click Next.
-
In the Additional information window, select .NET 7.0 (Standard Term Support) in the Framework drop-down if not already selected, and click Create.
-
Visual Studio creates the new project. If you get a Windows Security Alert warning you about the firewall blocking some features, select Allow access.
2. Add the Digi IoT Library for .NET MAUI to the project
To use the Digi IoT Library for .NET MAUI in an already existing project, you need to install it. Follow these steps to install the library in a project of a Visual Studio solution:
-
In Solution Explorer view, right-click the project from the solution and select Manage NuGet Packages…. The NuGet view opens.
-
Choose http://nuget.org as the Package source in the top-right corner of the NuGet view.
-
Select the Browse tab of the NuGet - Solution view.
-
Type DigiIoT.Maui in the search box and press <Enter>.
-
Select the DigiIoT.Maui package from the list and click Install.
-
Accept the license prompt.
-
Once the NuGet package is installed, close the NuGet - Solution view.
The package manager takes care of the dependencies required by the library. As soon as the library is installed, you are ready to start using the APIs it provides in your project.
3. Write the application code
Open the MainPage.xml file and replace the code with the following:
<?xml version="1.0" encoding="utf-8" ?>
<ContentPage xmlns="http://schemas.microsoft.com/dotnet/2021/maui"
             xmlns:x="http://schemas.microsoft.com/winfx/2009/xaml"
             x:Class="MyDigiIoTMAUIApp.MainPage">
</ContentPage>
Make sure the namespace (MyDigiIoTMAUIApp in this case) corresponds to the name of your project; if it does not, update it with the name of your project. Open the MainPage.xml.cs file and replace the code with the following:
using DigiIoT.Maui.Devices.XBee;
using DigiIoT.Maui.Exceptions;
using DigiIoT.Maui.Models;
using XBeeLibrary.Core.Exceptions;

namespace MyDigiIoTMAUIApp;

public partial class MainPage : ContentPage
{
    // Constants.
    // TODO: replace with the Bluetooth MAC address of your XBee device.
    private static readonly string BLE_MAC_ADDR = "00:0B:57:C2:66:D5";
    // TODO: replace with the Bluetooth password of your XBee device.
    private static readonly string BLE_PASSWORD = "12345";

    // Variables.
    private readonly ActivityIndicator activityIndicator;
    private readonly Label statusLabel;
    private readonly XBeeBLEDevice myXBeeDevice = null;

    public MainPage()
    {
        InitializeComponent();

        // Declare the XBee BLE device to connect to.
        myXBeeDevice = new XBeeBLEDevice(BLE_MAC_ADDR, BLE_PASSWORD);
        // Configure the page title.
        Title = "XBee BLE Application";
        // Set the page content.
        StackLayout contentLayout = new()
        {
            VerticalOptions = LayoutOptions.Center,
            HorizontalOptions = LayoutOptions.Center
        };
        activityIndicator = new ActivityIndicator
        {
            Color = Colors.DarkGray
        };
        statusLabel = new Label
        {
            HorizontalOptions = LayoutOptions.Center,
            Margin = new Thickness(25, 0),
            TextColor = Colors.DarkGray,
            FontSize = 16
        };
        contentLayout.Children.Add(activityIndicator);
        contentLayout.Children.Add(statusLabel);
        Content = contentLayout;
    }

    protected override async void OnAppearing()
    {
        base.OnAppearing();

        // Show an indicator while connecting to the device.
        activityIndicator.IsRunning = true;
        statusLabel.TextColor = Colors.DarkGray;
        statusLabel.Text = string.Format("Connecting to device {0}...", BLE_MAC_ADDR);
        // The connection process blocks the UI interface, so it must be done in a different thread.
        await Task.Run(() =>
        {
            try
            {
                // Check BLE status.
                try
                {
                    DigiBLEManager.ValidateBluetoothStatus();
                } catch (DigiIoTException ex)
                {
                    MainThread.BeginInvokeOnMainThread(() =>
                    {
                        DisplayAlert("Error checking Bluetooth", ex.Message, "OK");
                    });
                }

                // Open the connection with the device.
                myXBeeDevice.Connect();
                MainThread.BeginInvokeOnMainThread(() =>
                {
                    activityIndicator.IsRunning = false;
                    statusLabel.TextColor = Colors.DarkGreen;
                    statusLabel.Text = "Connected successfully to " + BLE_MAC_ADDR;
                });
            }
            catch (BluetoothAuthenticationException e)
            {
                // Error authenticating the device, check password.
                MainThread.BeginInvokeOnMainThread(() =>
                {
                    activityIndicator.IsRunning = false;
                    statusLabel.TextColor = Colors.DarkRed;
                    statusLabel.Text = "Invalid password: " + e.Message;
                });
            }
            catch (DigiIoTException e)
            {
                // Error opening the connection with the device.
                MainThread.BeginInvokeOnMainThread(() =>
                {
                    activityIndicator.IsRunning = false;
                    statusLabel.TextColor = Colors.DarkRed;
                    statusLabel.Text = "Error connecting to device: " + e.Message;
                });
            }
        });
    }

    protected override void OnDisappearing()
    {
        base.OnDisappearing();

        // Disconnect the device.
        activityIndicator.IsRunning = false;
        statusLabel.TextColor = Colors.DarkGray;
        statusLabel.Text = "Disconnected from device.";
        if (myXBeeDevice.IsConnected)
            myXBeeDevice.Disconnect();
    }
}
Make the following changes in the code:
-
Replace the BLE_MAC_ADDR and BLE_PASSWORD constants with the Bluetooth address and password of the device you will connect to.
-
Save and close the file.
4. Configure the Bluetooth permissions
The application requires some Bluetooth permissions to be configured in the specific OS platform of the project in order to be able to connect to Bluetooth Low Energy devices. The method of configuring permissions depends on the target OS.
Android
Open the manifest.xml file from the Android platform folder of the project and add the following lines:
<uses-permission android:name="android.permission.ACCESS_COARSE_LOCATION" android:maxSdkVersion="30"/>
<uses-permission android:name="android.permission.ACCESS_FINE_LOCATION" android:maxSdkVersion="30"/>
<uses-permission android:name="android.permission.BLUETOOTH" android:maxSdkVersion="30"/>
<uses-permission android:name="android.permission.BLUETOOTH_ADMIN" android:maxSdkVersion="30"/>
<uses-permission android:name="android.permission.BLUETOOTH_CONNECT" />
<uses-permission android:name="android.permission.BLUETOOTH_SCAN" android:usesPermissionFlags="neverForLocation"/>
iOS
Open the info.plist file from the iOS platform folder of the project and add the following lines:
<!--Description of the Bluetooth request message (required on iOS 10, deprecated)-->
<key>NSBluetoothAlwaysUsageDescription</key>
<string>Your permission request text here</string>
<!--Description of the Bluetooth request message (required on iOS 13)-->
<key>NSBluetoothPeripheralUsageDescription</key>
<string>Your permission request text here</string>| Check Manage Bluetooth permissions for more information about Bluetooth permissions. |
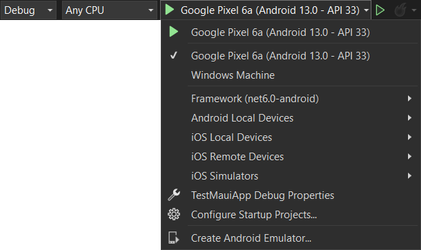
5. Launch the application
To launch the application, you must first select the target platform from the launch menu:
| If you are launching the application in iOS, remember to connect your iOS device to your Mac computer and then Pair to Mac. |
Then, select the Debug > Start Debugging option from the main menu.
Once the application is run in the device it displays a message indicating that it is connecting to the XBee device. If connection succeeds, the text color changes to green and displays Connected successfully to 00:00:00:00:00:00. If it fails, the text color changes to red and displays the error that occurred.