


Updating the firmware is essential for maintaining the reliability, security, and performance of your XBee 3 BLU module. It ensures the device runs the latest software, which may include bug fixes, performance improvements, and new features.
| You should update the firmware when new versions are released, especially if they address security vulnerabilities or add relevant functionalities. |
Depending on your use case or status in the development cycle, you can update the firmware of your XBee 3 BLU device with either of the following approaches:
-
Serially:
-
Wirelessly:
Using XBee Studio serial firmware update
XBee Studio allows you to update the firmware of any XBee device connected to your PC via the serial interface.
It is recommended to use XBee Studio to update the firmware of your device individually through the serial interface during the early stages of development. For example, this may be necessary if you purchase a module and discover a newer firmware version is available upon connection.
-
Connect your device to a PC where XBee Studio is installed.
This section assumes that you know how to connect the XBee 3 BLU device to a PC. For more information on how to connect an XBee device to a PC, see the Step 2 - Set up the hardware page from the getting started section. -
Open XBee Studio.
-
Wait for your device to be discovered.
A module that’s never been configured should be discovered automatically, but if you have problems discovering your local device, see the Device discovery tools section of XBee Studio User Guide to learn how to do it manually.
-
Click on the device. The Dashboard page appears. It contains:
-
The device information.
-
Connection interface.
-
A list of quick actions.
-
-
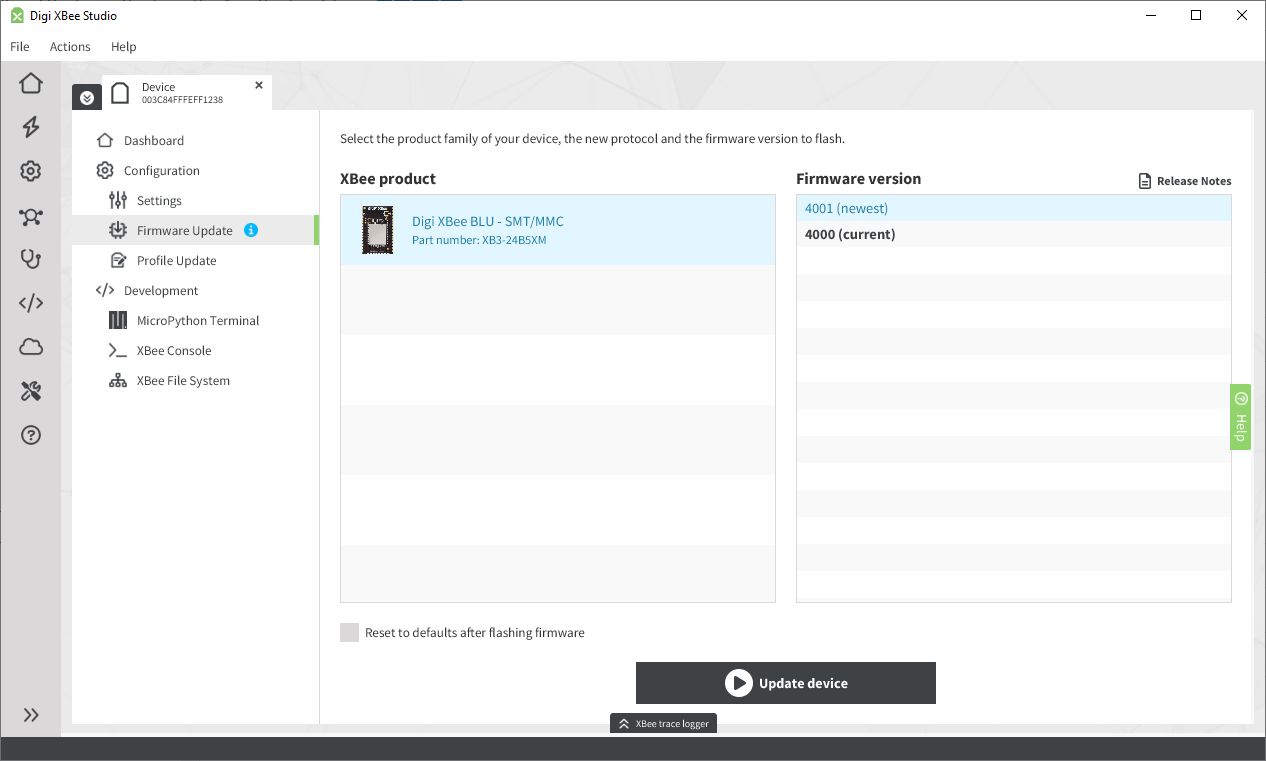
Select the Firmware Update item in the sidebar of the tab. It is located within the Configuration section.
-
As seen in the above image, you can see all the available firmware versions for your device. Select the version to which you want to update.
-
To trigger an update, click the Update device gray button located at the bottom of the page.
-
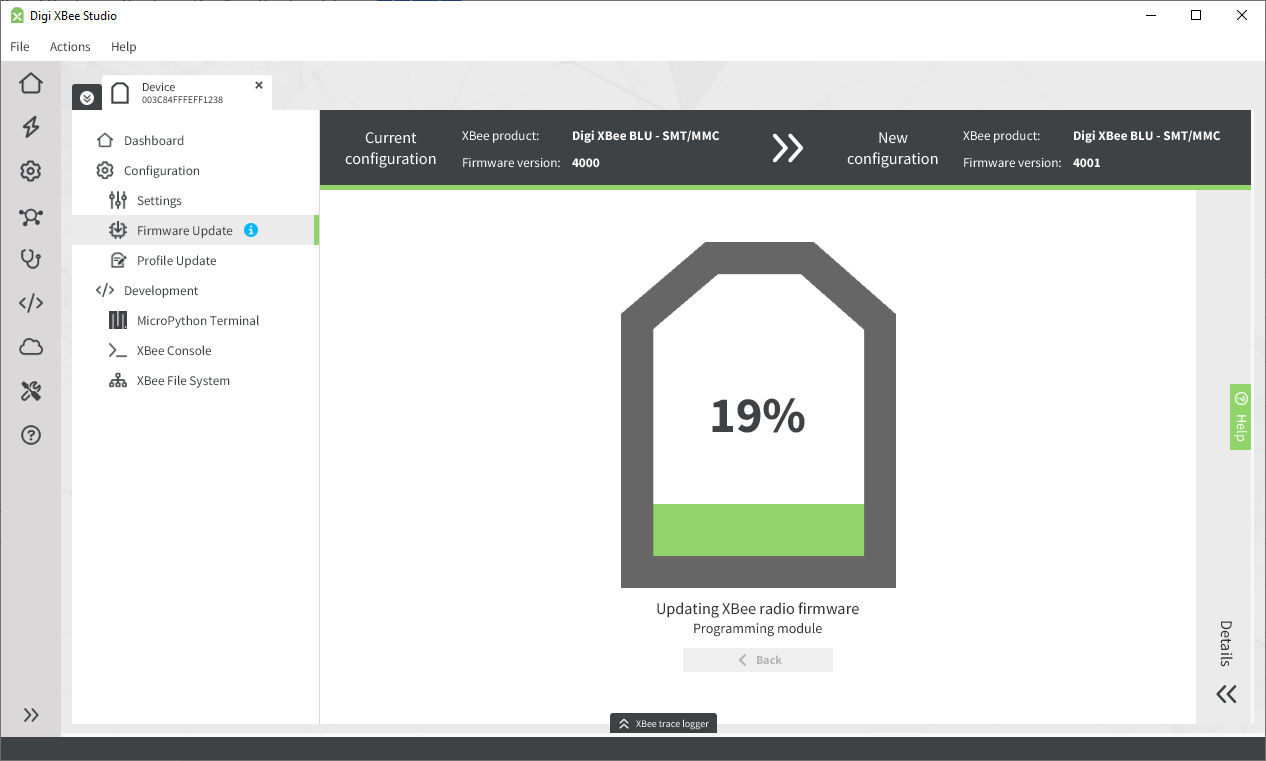
The contents of the page change to display the update process information
-
When the process finishes, your device will automatically run the new firmware.
| See the Firmware update section of the XBee Studio User Guide for more information. |
Using a host processor/bootloader
When the XBee is connected to a host processor, the firmware can be updated by invoking the XBee bootloader and transferring the firmware image using XMODEM.
This process is also used for updating a local device’s firmware using XBee Studio.
XBee devices use a modified version of Silicon Labs' Gecko bootloader. This bootloader version supports a custom entry mechanism that uses module pins DIN, DTR/SLEEP_RQ, and RTS.
To invoke the bootloader using hardware flow control lines, follow the steps below:
-
Set DTR/SLEEP_RQ low (CMOS0V) and RTS high.
-
Send a serial break to the DIN pin and power cycle or reset the module.
-
When the device powers up, set:
-
DTR/SLEEP_RQ and DIN: low (CMOS0V)
-
RTS: high
-
-
Terminate the serial break and send a carriage return at 115200 baud to the device.
-
If successful, the device sends the Silicon Labs' Gecko bootloader menu out the DOUT pin at 115200 baud.
-
You can now send commands to the bootloader at 115200 baud.
| Disable hardware flow control when entering and communicating with the bootloader. |
All serial communications with the module use 8 data bits, no parity bit, and 1 stop bit.
You can also invoke the bootloader from the XBee application by sending %P (Invoke Bootloader).
After successfully invoking the bootloader menu, you are ready to upload a firmware image through the UART interface:
-
Look for the bootloader prompt BL > to ensure the bootloader is active.
-
Send an ASCII 1 character to initiate a firmware update. The device will then wait for an XModem CRC upload of a
.gblimage over the serial line at 115200 baud. -
Send the
.gblfile to the device using standard XMODEM-CRC. If the firmware image is successfully loaded, the bootloader outputs a "complete" string. -
Invoke the newly loaded firmware by sending a 2 to the device.
If the firmware image is not successfully loaded, the bootloader outputs an "aborted string" and returns to the main bootloader menu.
Some causes for failure are:
-
Over one minute passes after the command to send the firmware image and the first block of the image has not yet been sent.
-
A power cycle or reset event occurs during the firmware load.
-
A file error or a flash error occurs during the firmware load. The following table contains errors that could occur during the XMODEM transfer:
Error Cause Solution 0x18
When a serial upload attempt has been abruptly discontinued by invoking Ctrl+C and subsequently another attempt is made to upload a
.gblfile by selecting 1 on the bootloader menu.-
Select 2 on the bootloader menu.
-
The bootloader reboots.
-
The bootloader menu is displayed again.
-
Select 1 and upload the
.gblfile.
-
-
Ensure your XBee device is connected to your PC and is part of the network the remote device belongs to.
-
Open XBee Studio.
-
Wait for your device to be discovered.
-
Click on the device. The Dashboard page appears. It contains:
-
The device information.
-
Connection interface.
-
A list of quick actions.
-
-
Select the Network Topology item in the sidebar of the tab. It is located within the Network section.
-
XBee Studio automatically starts a continuous network discovery. Wait for the device to be updated to appear.
-
Double-click on the device to update. The Dashboard page of the remote device appears.
-
Select the Firmware Update item in the sidebar of the tab. It is located within the Configuration section.
-
As with local devices, you can see all the available firmware versions for your device. Select the version to which you want to update.
-
To trigger an update, click the Update device gray button located at the bottom of the page.
-
The contents of the page change to display the update process information (similar to the update process of a local device).
-
When the process finishes, your device will automatically run the new firmware.
| See the Firmware update section of the XBee Studio User Guide for more information. |
Using XBee Mobile app
XBee Mobile app, as well as XBee Studio, allows you to update the firmware of a device, but it does so wirelessly via Bluetooth®.
This approach is particularly useful in the later stages of a product’s lifecycle. For example, if your device has been deployed for a while and a new firmware version with security fixes becomes available, you can use your phone to upgrade the firmware over Bluetooth® instead of bringing a laptop.
-
Connect your device to a PC where XBee Studio is installed.
This section assumes that you know how to connect the XBee 3 BLU device to a PC. For more information on how to connect an XBee device to a PC, see the Step 2 - Set up the hardware page from the getting started section. -
Open XBee Studio.
-
Wait for your device to be discovered.
A module that’s never been configured should be discovered automatically, but if you have problems discovering your local device, see the Device discovery tools section of XBee Studio User Guide to learn how to do it manually.
-
Click on the device. The Dashboard page appears. It contains:
-
The device information.
-
Connection interface.
-
A list of quick actions.
Bluetooth® Low Energy (LE) can be enabled either through Quick Actions, which simplify the configuration process (only valid for the supported actions), or manually through the Settings view. -
Go to the Settings page of your device and:
-
Set the Bluetooth Identifier (
BI) setting toXBee_BLU_1. -
Set the Bluetooth Enable (
BT) setting toEnabled [1]. -
Configure the authentication to communicate with your device by clicking the Configure button on the Bluetooth® Authentication setting. Type a new password in the Password field of the Basic configuration section in the popup.
Memorize this password because you will use with the mobile application. You can change the password at any time following the above process. -
Click the Write settings button on the top toolbar and wait for the settings to be written to the device.
-
-
In the Quick Actions section of the Dashboard page of your device click the Bluetooth® Configuration quick action.
-
Set the Enable Bluetooth Low Energy interface checkbox to enabled.
-
Enter a value of your choice in the Identifier field.
In order to use the XBee Mobile app, you should start the Identifier value with the word XBee. If you don’t want to, remember to disable the filter in the app when you use it for the first time. -
Enter a value of your choice in the Password field.
Memorize this password because you will use with the mobile application. You can change the password at any time following the above process. -
Click the Apply button and wait for the settings to be written to the device.
-
-
-
-
Open the XBee Mobile app. (Make sure Bluetooth® is enabled on the phone or tablet.)
-
Wait for your device to be discovered and select it once it appears in the list.
-
Introduce the Bluetooth® authentication password of your device.
-
In the device main page, tap on the Update firmware utility.
-
In the Update firmware page, select the firmware version you want your device to update to.
-
Depending on the hardware of your device, you may need to specify the product the firmware version is associated to. In such case, select the corresponding product.
-
Then, select the target firmware version.
-
-
Finally, tap on the Start Update button. This will trigger the firmware update process.
Firmware update processes can be time-consuming, especially when performed over Bluetooth®. For this reason, make sure not to close the app while this process is running.
| See the Update the device firmware section of the XBee Mobile app User Guide for more information. |
