Step 2: Connect the power supply
You must connect a power supply to the Connect EZ and then plug it into a mains power supply. Each Connect EZ variant has different power supply requirements.
- Connect EZ 4: Connect EZ 4 is intended to be powered by a locking barrel output transformer rated 100-240 VAC to 12 VDC, and with a 3 A output.
The power supply is included with the Connect EZ 4 device.
-
Connect EZ 4i: Connect EZ 4i is intended to be powered by a certified extended temperature power supply pigtail DC cable with output rated at 100-240 VAC to 12 VDC 3 A, -40 C to +74 C.
The power supply is included with the Connect EZ 4i device.
-
Connect EZ 4 with PoE: Connect EZ 4 with PoE can be powered by a locking barrel output transformer rated 100-240 VAC to 12 VDC, and with a 3 A output.
Connect EZ 4 with PoE does not come with a power supply. You can order the following: Connect EZ 2/4 Power Supply Accessory Kit: Digi PN 76002119.
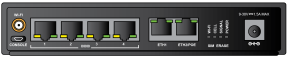
In addition, you can connect an 802.3af PoE PSE (power source) to the ETH2/POE port and use it as a remote power point. See Front panel and LEDs.
For more information about the power supplies, see Step 1: Verify product components.
-
Orient the device so the front of the device is facing you.
-
Connect the end of the power supply cord to the device.
-
Connect EZ 4 and Connect EZ 4 with PoE: Locking barrel connector
-
Align the power cord connector flanges with the slot in the power connector.

-
Fully insert the power cord connector.

-
Twist 90 degrees to the right. The power cord connector locks securely into place.
-
-
Connect EZ 4i: Wired power connector
-
Push the red stripped wire into the positive (+) port in the power connector.
-
Push the black stripped wire into the negative (-) port in the power connector.
-
Plug the power supply into the power cord.
-
-
-
Plug the other end of the power supply cord to a mains power supply.
-
As the device powers up, multiple LEDs may blink, including the Power LED. When complete, the Power LED is solid blue.
NEXT STEP: If you are performing the initial device set-up, proceed to the next step: Step 3: Connect to site network using an Ethernet LAN.
 PDF
PDF


