Wire the sensors to the Connect Sensor XRT-M NEMA I/O interface
This section explains how to wire sensors to the Connect Sensor XRT-M NEMA and use the cable glands on the device to contain the sensor wires.
Before you begin, review the pin assignments. See Connect Sensor XRT-M NEMA I/O interface pin assignments.
Equipment needed
To wire third-party sensors or a power source to the Connect Sensor XRT-M NEMA I/O interface, you need the following equipment:
-
The accessory pack of two cable glands.
- A slot-headed 0.4 x 2.5 x 80 mm screwdriver
- Wire size 1.29-0.25 mm (16-30 AWG) for each pin connector
Note All external or field wiring must be in accordance with NFPA 70 Article 501.10(B).
Note Using gaskets, seals, glands or plugs other than those supplied by Digi may void certifications and regulatory approvals.
Disconnect power from the device before you begin
CAUTION! You must disconnect both batteries and external power from the Connect Sensor XRT-M NEMA before wiring sensors to the I/O interface.
WARNING! If you disconnect the batteries and reconnect them, it resets the cycle counter. The default is 7,000 cycles.
To wire sensors to the I/O interface:
-
Orient the Connect Sensor XRT-M NEMA so the top of the device is facing you.
- Open the case.
- Disconnect any external power source from the Connect Sensor XRT-M NEMA.
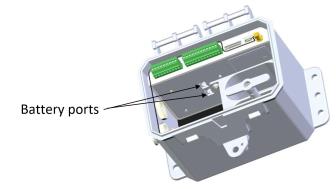
- Disconnect the batteries inside the case.
- The battery wires are connected to a battery port on the side of the device. Pinch the battery connector and pull it from the battery port.
- Repeat this step for each battery.
- Remove the plug from on of the cable gland connectors on the side of the device.
- Using either a wrench or your fingers, unscrew the plug on the outside of the case from the nut on the inside of the case.
Retain the nut for the next step.
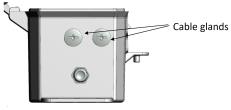
- Connect a cable gland to the case.
- Remove a cable gland from the accessory pack.
- Insert the end of the cable gland with the screw into the space from which you removed the plug.
- Carefully screw the nut retained from the previous step onto the cable gland screw. You may need to use a wrench to tighten the screw and securely attach the cable gland. Take care to not over-tighten the nut.
- Twist the cable glands open.
- Run the sensor cable through the cable glands and thread it through the cable gland connector.
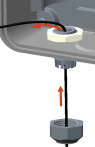
- Connect the sensor cable to a pin on the terminal block.
- Use the screwdriver to loosen the I/O interface connector screw.
- Slide the wire into the terminal side of the connector.
- Tighten the screw to 0.2 N-m to secure the wire to the connector.
- Twist the cable gland closed to seal and secure the sensor cables.
- Connect the batteries to the battery ports.
- Hold the battery connector for one of the batteries and push the battery connector into the bottom battery port.
- Hold the battery connector for the second battery and push the battery connector into the top battery port.
- Close the cover on the device. The cover snaps into place.
Note The Connect Sensor XRT-M NEMA enclosure may require some force to close. This is intended as part of the design to ensure a robust seal in damp or dusty environments. For details about closing the Connect Sensor XRT-M NEMA enclosure, see Close the Connect Sensor XRT-M NEMA case.
 PDF
PDF


