Mount the Connect EZ device
There are two mounting options available:
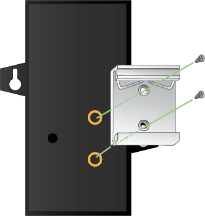
Attach to a mounting surface using the two mounting tabs
Attach the device to a surface using the two tabs on the device. The type and length are dependent on the mounting surface type.
Note Screws are not provided.
Mounting onto soft or thin materials
Examples: Wallboard, sheetrock, wood, thin sheet metal, or plastic.
Use a screw that meets these requirements:
-
M4 pan-head Philips screw
-
Coarse-thread sheet metal screw
-
12 mm in length. The length should clear the mounting tab thickness and leave at least 1 cm of screw shank to bite into the mounting material.
Mounting onto thicker metals
Examples: Aluminum or steel.
Use a screw that meets these requirements:
-
M4 pan-head Philips screw
-
Machine-thread screw
-
12 mm in length. The length should clear the mounting tab thickness and leave at least 1 cm of screw shank to bite into the mounting material.
Attach to DIN rail with clip
The DIN rail clip and two screws are included with the device. You will need an appropriate Phillips-head screwdriver. For details about the hardware, see DIN rail clip information.
-
Remove required items from DIN rail mounting kit:
- DIN rail clip
- Two flat head screws.
-
Place the DIN rail clip on the rear panel of the device. Make sure the screw holes are aligned.
-
In each hole, use a Phillips-head screw driver to screw in a screw.
-
Tighten the screws as needed to securely fasten the DIN rail clip to the device.
-
Set the device onto a DIN rail and gently press until the clip snaps into the rail.
 PDF
PDF


