Install and configure RealPort on your computer
You can configure your computer to communicate with the Connect EZ using RealPort. In this step, RealPort is installed on your computer and communication with the device is configured.
Configuring RealPort on your device is the second step in a two-step process. To ensure communication between the device and your laptop, you must also have configured your device for RealPort. See Configure RealPort on a Digi device from the Digi Navigator.
Note You can also manually install and configure RealPort on your computer. See Advanced RealPort configuration without using the Digi Navigator.
-
Make sure the Connect EZ is powered and connected your local network or computer with an Ethernet cable.
-
Launch the Digi Navigator.
-
A list of the devices discovered by the Digi Navigator displays. For information about how devices are discovered and how to add a device to the list, see Digi Navigator device discovery process.
-
Find the device that you want to access and expand it to display the IP addresses for the device.
-
Use one of the following methods to begin configuring RealPort on your computer:
-
Configuration pane: Click on the IP address to display options in the Configuration pane. Click Configure this PC for RealPort. The Select RealPort Features dialog displays.
-
Shortcut menu: Right-click on an IP address to display the shortcut menu, and click Configure this PC for RealPort. The Select RealPort Features dialog displays.
-
-
Configure features in the Select RealPort Features dialog.

-
Enable Encryption to enable encryption of data. This is enabled by default.
-
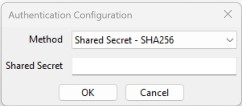
Enable Authentication to configure the authentication method the RealPort server uses to authenticate clients. The Authentication Configuration dialog displays.
-
From the Method list box, select the Shared Secret - SHA256 option.
-
For Shared Secret, enter the authentication password to ensure secure communication. Leave this field blank to disable authentication.
-
-
Click OK.
-
-
The Select Ports dialog displays. By default, all of the ports on the device are selected to be configured for RealPort. De-select the ports that you don't want to configure for RealPort.
-
Click OK. The COM Selection dialog displays.
-
From the Select starting COM list box, select the first COM port that should be configured for RealPort. The first available COM port is selected by default. The number of COM ports configured matches the number of serial ports on the device.
-
Click OK. A series of progress messages displays.
-
When the configuration is complete, a message displays.

-
Click OK to close the message.
-
(Optional) After RealPort configuration on your laptop is complete, you can open the Windows Properties dialog for your computer.
-
Launch the Digi Navigator if it is not currently open. A list of devices that have RealPort enabled and configured displays in the Installed RealPort Devices section at the bottom of the screen.
-
Double-click on a device name. The Windows Properties dialog for your computer displays. and display the COM ports on your computer that are configured for RealPort. For more information, see Review the COM ports configured for RealPort.
-
 PDF
PDF


