Step 5: Configure RealPort from the Digi Navigator
You can configure the Connect EZ to communicate with your computer using RealPort from the Digi Navigator. You must enable RealPort on the device and then configure your computer for RealPort.
In this step, all serial ports on the device are set to RealPort mode and the RealPort service is enabled. The COM ports on your laptop are also configured.
Note You can also manually configure the device for RealPort by logging into the device's web UI. See Advanced RealPort configuration without using the Digi Navigator.
-
Download and install the Digi Navigator on your computer.
-
Make sure the Connect EZ is powered and connected your local network or computer with an Ethernet cable.
-
Launch the Digi Navigator.
-
A list of the devices discovered by the Digi Navigator displays. For information about how devices are discovered and how to add a device to the list, see Digi Navigator device discovery process.
-
Configure RealPort on the device.
-
Find the device that you want to configure and expand it so you can see the IP address for the device.
-
Click on the IP address of the device. The configuration pane on the right side of screen shows information about the selected device.
-
Click Configure Device for RealPort. The Enter Device Credentials screen displays.
-
Enter the device's default user name and password in the Username and Password fields. The default user name is admin and the default password is the unique password printed on the label packaged with your device. If the defaults do not work, they may have been changed. Verify with your system administrator.
-
Click OK.
-
When RealPort configuration is complete, the Success message displays.

-
Click OK to close the message.
-
-
Configure RealPort on your computer. The RealPort service is installed during this process.
-
In the configuration pane, click Configure this PC for RealPort. The Select RealPort Features dialog displays.

-
Enable Encryption to enable encryption of data. This is enabled by default.
-
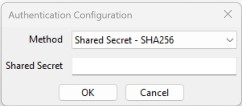
Enable Authentication to configure the authentication method the RealPort server uses to authenticate clients. The Authentication Configuration dialog displays.
-
From the Method list box, select the Shared Secret - SHA256 option.
-
For Shared Secret, enter the authentication password to ensure secure communication. Leave this field blank to disable authentication.
-
-
Click OK.
-
-
The Select Ports dialog displays. By default, all of the ports on the device are selected to be configured for RealPort. De-select the ports that you don't want to configure for RealPort.
-
Click OK. The COM Selection dialog displays.
-
From the Select starting COM list box, select the first COM port that should be configured for RealPort. The first available COM port is selected by default. The number of COM ports configured matches the number of serial ports on the device
-
Click OK. A series of progress messages displays.
-
When the configuration is complete, a message displays.

-
Click OK to close the message. Configuration is complete.
-
NEXT STEP: If you are performing the initial device set-up, proceed to the next step: Step 6: Connect to the web UI and update the Connect EZ firmware.
 PDF
PDF


