Configuring a TAP-styled OpenVPN server and client
Goal
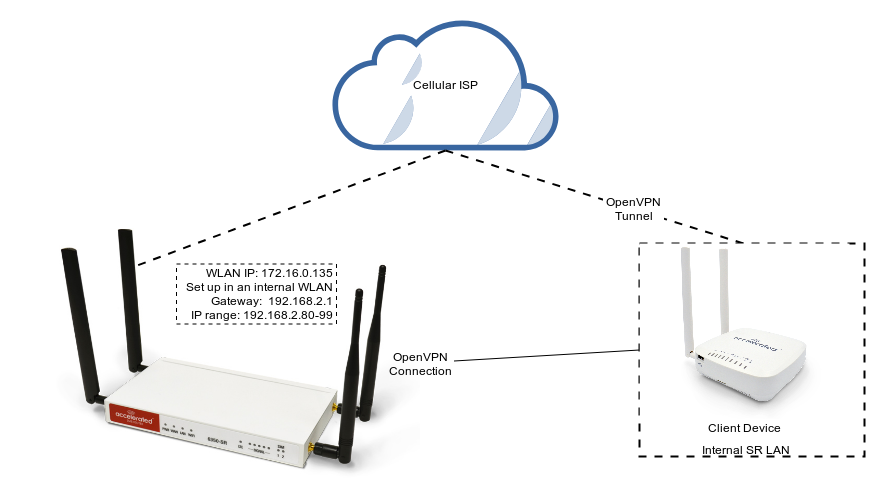
Configuring simple (username/password authentication only) OpenVPN server and client instances on an OpenVPN-enabled device. The instances will be created on separate 6350-SR devices connected over a simple WiFi (172.16.0.0/24) network. The WiFi network represents the Cellular ISP.
This article focuses on configuring a TAP-style tunnel. For configuring and connecting to a TUN-style OpenVPN client using the OVPN file, visit the article Configuring an OpenVPN client.
Relevant files
The files used to create this example are attached below:
Setup
This article assumes you have basic understanding of server-authentication, certificates, keys, and the fundamentals of OpenVPN. It also assumes the appropriate private and public certificate (*.crt), key (.*key), and Diffie-Hellman (dh2048.pem) files, as well as the OpenVPN configuration file (*.ovpn) are correctly generated. For more details on generating these files, visit https://www.digitalocean.com/community/tutorials/how-to-set-up-an-openvpn-server-on-ubuntu-16-04.
Sample
The sample configuration below shows an example network with an OpenVPN-enabled device connected via the TAP-style tunnel.
Sample configuration
Open the configuration page and set the following configurations.
OpenVPN Section Configuration
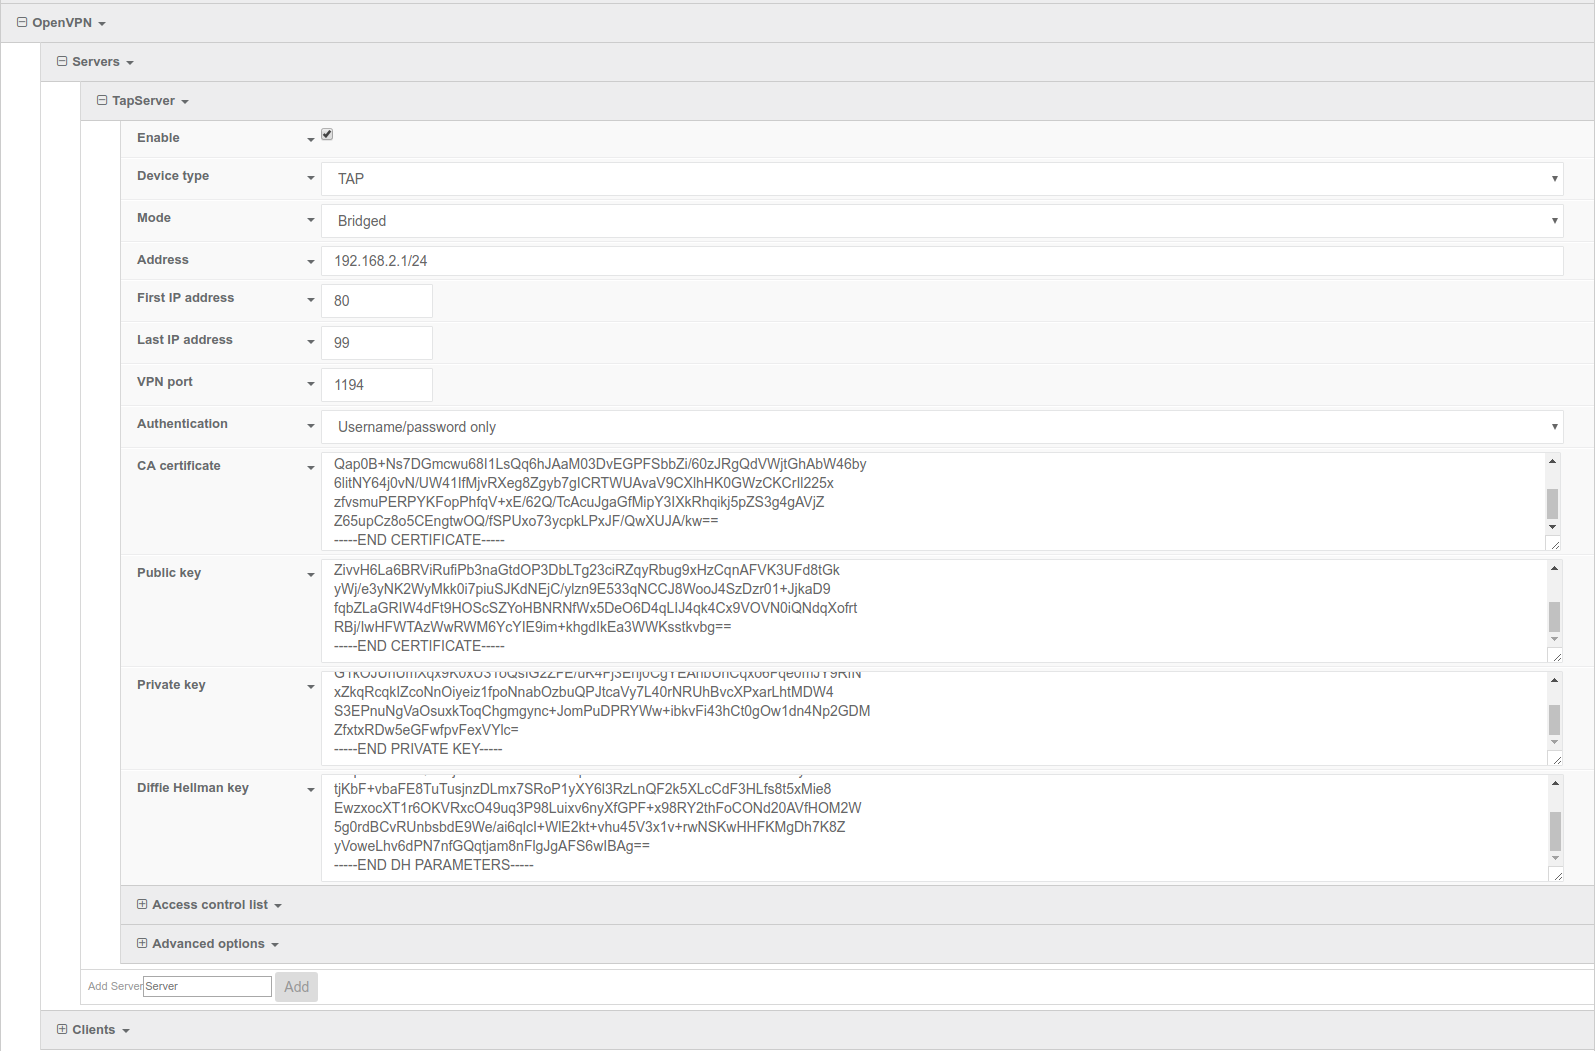
- In the VPN > OpenVPN > Servers section, specify a name for the new OpenVPN server (for example, TapServer) and click Add.
- Ensure Enable is selected.
- Ensure the Device type pull-down menu is selected to be TAP. A TAP-styled device encapsulates the ethernet frames similar to a physical network interface.
-
Ensure the Device pull-down menu is selected to be Bridged, as the device is treated as another device on the bridge.
-
Set Address to 192.168.2.1/24, this must be a valid gateway in the network of the IP address range.
-
Specify the First IP address and the Last IP address of the address range if different from the default values.
-
From the Authentication pull-down menu, select Username/password only.
-
Insert the contents of the generated CA certificate (usually in ca.crt file), Public key (e.g. server.crt), Private key (e.g. server.key), and the Diffie Hellman key (usually in dh2048.pem) in their respective fields. The contents will be hidden when the configuration is saved.
- Ensure the Zone pull-down menu is selected to be Internal, as the clients are treated as a LAN devices.
- Set Address to 192.168.2.1/24, this must be a valid gateway in the network of the IP address range.
- Specify the First IP address and the Last IP address of the address range if different from the default values.
- From the Authentication pull-down menu, select option Username/password only.
- Insert the contents of the generated CA certificate (usually in ca.crt file), Public key (for example, server.crt), Private key (for example, server.key), and the Diffie Hellman key (usually in dh2048.pem) in their respective fields. The contents will be hidden when the configuration is saved.
Full files used in this example are attached in the Relevant Files section above.
Network Section Configuration
- In the Network > Bridges > LAN > Devices section, click Add to add a new device to the bridge.
- From the pull-down menu, select Server: TapServer.
Note that bridging will only allow one TAP server to work. If multiple TAP servers are required, separate interfaces for each server will need to be created.

Authentication Section Configuration
The following configurations add a new user/group to handle OpenVPN access:
- In the Authentication > Groups section, specify a name for the OpenVPN group (for example, tapGroup).
- Select OpenVPN access.
- Expand OpenVPN tab, using the pull-down menu next to Tunnel, select appropriate OpenVPN instance, for example, Server: TapServer.
- In the Authentication > Users section, specify a name for a new OpenVPN user (for example, tapUser).
- In the new tapUser user section, ensure Enable is checked, and specify a password for this user (for example, tapPassword).
- In the tapUser > Groups section, click Add and from the pull-down, select the OpenVPN group you wish to affiliate with this user (for example, tapGroup).
- Press Save at the bottom of the configuration page to save changes.

The OpenVPN server should now be operational. When a client is connected, in the Status > Tunnels page, the OpenVPN section should display a server status with a :
Example TAP-style client configuration
This example sets up the client connection manually without an OVPN file. Same principle applies if an OVPN file is used.
OpenVPN section configuration
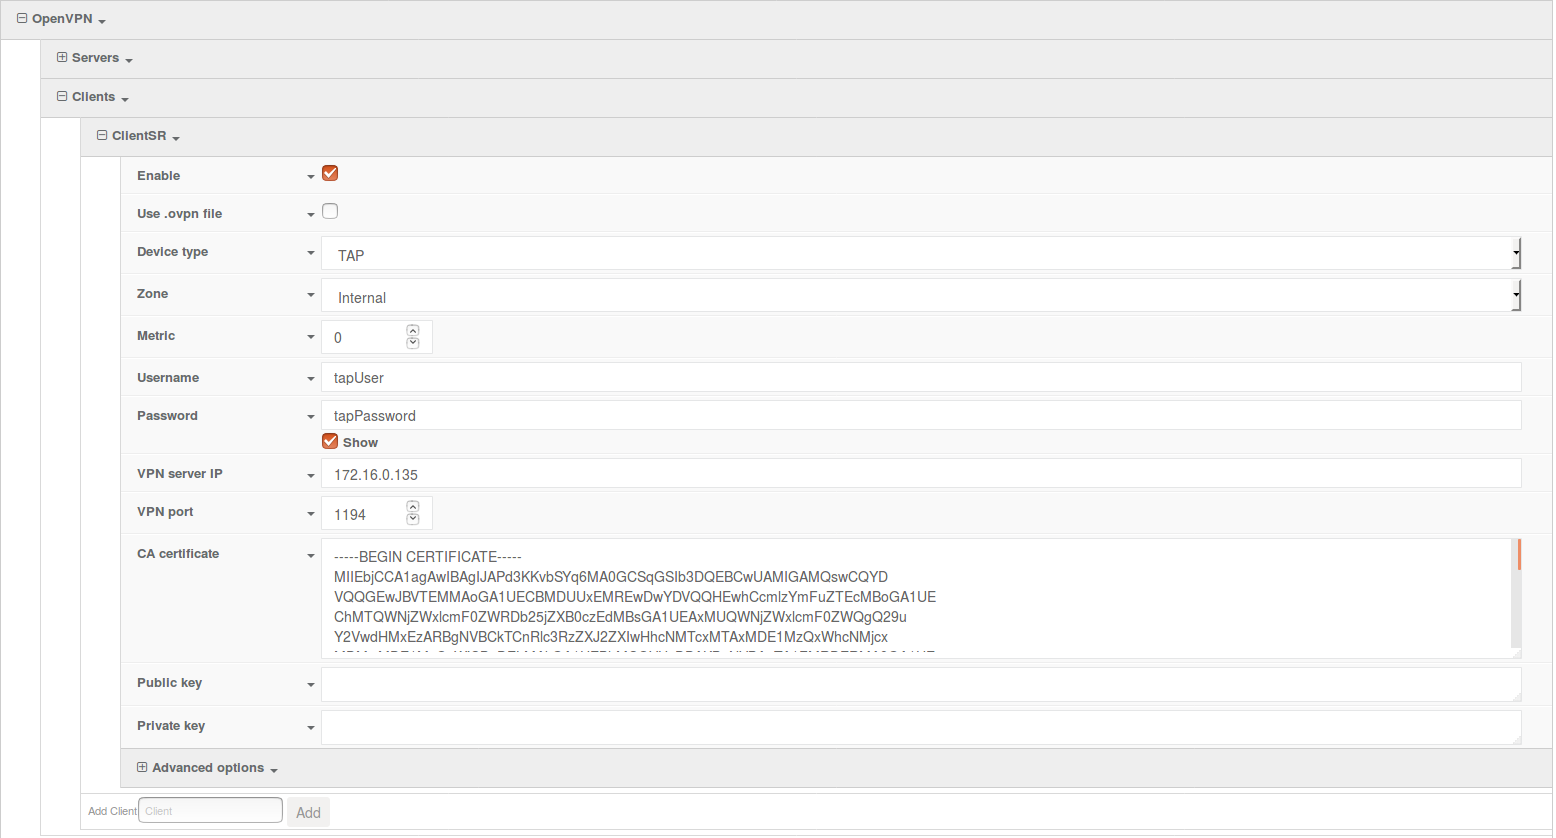
- In the VPN > OpenVPN > Client section, specify a name for the new OpenVPN server (for example, ClientSR) and click Add.
- Ensure Enable is selected.
- Ensure Use .ovpn file is deselected.
- Ensure the Device type pull-down menu is selected to be TAP.
- Ensure the Zone pull-down menu is selected to be Internal.
- Set the Username and Password fields to the appropriate user credentials as specified in the server (for example, tapUser and tapPassword).
- In the VPN server IP field, specify the IP address of the server.
- In the CA certificate field, insert the contents of the generated CA certificate (usually in ca.crt file as attached)
- Press Save at the bottom of the configuration page to save changes.
If the configuration is set up correctly and a connection is established, connection-specific information will display on the Tunnels > OpenVPN section of the Status page.
The relevant information about status of the server and the connected clients are shown on the server's Status page:

The relevant information about status of the client connection are shown on the client's Status page:


