Replace the SIM card and change the cellular network settings from the CLI
Each Connect Sensor has a SIM card supplied by Digi installed by default, but you can choose to replace the Digi-supplied SIM card with your own SIM. If you do, you are required to configure the device with the credentials for the new SIM card.
If any information from the SIM card carrier is not correctly applied, the device will no longer connect to Digi Axess.
Before you begin
You will need the following items:
-
SIM card: Make sure you have the SIM card you want to insert into the device.
-
Small tool: You will need a small tool to push the access tab next to the SIM slot.
-
Magnet: You will need a magnet to manually wake the device.
-
USB type A to B cable: You will need a USB type A to B cable to connect your computer to the Connect Sensor.
You should have these items prepared:
-
The new SIM card must be activated.
-
Make sure you have the APN and additional information from the carrier about the SIM card you want to insert into the device.
-
You should have a terminal emulator, such as Tera Term or Putty, installed on your computer.
-
You must be physically close enough to the device to connect your computer to it, wake it with the magnet, and replace the SIM card.
Step 1: Configure the APN cellular network settings for the new SIM card
In this step, you will configure the APN on the device using the CLI. This ensures that when the device connects to Digi Axess, the configuration updates from Digi Axess match the configuration already on the device.
-
Use the USB cable to connect your computer to the device.
-
Connect the type A end of the USB cable to the USB port on your computer.
-
Connect the type B end of the USB cable to the mini USB port on the device.
-
-
Open the terminal emulator on your computer.
-
Open a connection to the USB port on the device. Use these settings:
-
Connection port: Connect to the COM port associated with the USB cable connected to the Connect Sensor.
-
Baud rate or bits per second: 115200
-
Data: 8 bit
-
Parity: None
-
Stop: 1 bit
-
Flow control: None
-
-
Use the magnet to wake the Connect Sensor.
-
Type the CLI command: custom apn=<apn>
where <apn> is the APN for the carrier.
-
Press Enter.
Note The Connect Sensor waits 30 seconds from when you pressed Enter to begin processing the command.
- If your carrier requires additional APN access information, enter the following commands and provide the information. Press Enter after each command.
- Type the CLI command: custom usr=<usr>
where <usr> is the user name associated with the APN.
- Type the CLI command: custom pwd=<pwd>
where <pwd> is the password associated with the APN.
- Type the CLI command: custom pin=<pin>
where <pin> is the PIN associated with the SIM card.
- Type the CLI command: custom usr=<usr>
-
(Optional) If you entered a custom command, you can use the activate command to process the custom command immediately, rather than waiting 30 seconds.
-
Type the CLI command: activate
-
Press Enter.
-
-
When the Connect Sensor has processed the CLI command, the device goes to sleep. The following line displays in the terminal program when the device is sleeping:
Zzz...
-
Close the terminal program after the device has gone to sleep.
-
Disconnect the USB cable from the Connect Sensor and the computer.
-
Continue to Step 2.
Step 2: Install your new SIM card
In this step, you will remove the existing SIM card and insert the new one.
Note Retain the Digi-supplied SIM card, in case you need to reset the device to the default configuration.
-
Orient the Connect Sensor so the top of the device is facing you.
-
If your device has a NEMA case, open the case.
-
Locate the SIM card slot.
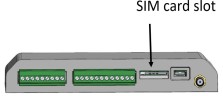
-
Use your tool to push the existing SIM card into the slot. The SIM card will pop out.
-
Remove the existing SIM card and retain it in a safe place.
-
Insert your new SIM card into the SIM card slot. Match the chamfered corner of the SIM card to the chamfered corner of the slot.
-
Use your tool to push the SIM card into the slot.
-
If your device has a NEMA case, close the case.
-
Continue to Step 3.
Step 3: Verify that the Connect Sensor can connect to Digi Axess
In this step, you will verify that the device's APN has been configured correctly by making sure the device can connect to Digi Axess.
-
Connect to Digi Axess and update the configuration on the Connect Sensor.
-
Manually wake the Connect Sensor with the magnet.
-
When the device wakes up, it connects to Digi Axess and applies any configuration changes.
-
When the updates are complete and the Connect Sensor is asleep, continue to the next step.
-
-
Find the updated device using one of the following methods.
-
Use the Search Devices field in the toolbar to find the device that you just updated. You can search by serial number or location name.
-
Click on the device's location pin in the map.
-
Select the device from the list of mapped devices.
-
Display the devices in the table format and search for the device.
-
 PDF
PDF


