Load an AnywhereUSB SSL certificate
You can configure an AnywhereUSB SSL certificate for the AnywhereUSB Hub to use forAnywhereUSB Manager connections. This certificate is used instead of the Web Administration service certificate that is used for other services in the DAL OS.
Best practice Digi recommends using the certificate for the Web Administration service for AnywhereUSB, instead of configuring a AnywhereUSB SSL certificate. AnywhereUSB by default uses the Web Administration service certificate in use by the DAL OS.
How do the Web Administration services certificate and the AnywhereUSB Hub certificate work together?
A Web Administration services certificate is always available, as either a self-signed certificate or one that you have supplied and configured. By default, the Web Administration services certificate is used for AnywhereUSB.
If, however, you choose to configure an AnywhereUSB SSL certificate, you should be aware of how the Web Administration services certificate and the Anywhere USB SSL certificate work together.
-
If the AnywhereUSB SSL certificate is not configured: Both the Web Administration services and AnywhereUSB use the same Web Administration services certificate.
-
If the AnywhereUSB SSL certificate is configured: The AnywhereUSB service uses the AnywhereUSB certificate configured for AnywhereUSB instead of the Web Administration services certificate.
Step 1: Prepare the AnywhereUSB SSL certificate
You must prepare the SSL certificate information to ensure that the certificate can be configured on the AnywhereUSB Hub to use for AnywhereUSB Manager connections.
Step A: AnywhereUSB Hub: Prepare certificate information in Notepad
Use Notepad to prepare the certificate information so that you can copy and paste it into the AnywhereUSB service configuration. Open the certificate, and organize the information in Notepad in the following order:
-
Primary certificate: Required
-
Intermediate CA certificate(s): You may have intermediate CA certificates in your certificate information. If there are multiple intermediate certificates, they must be in order from lowest (issuer of primary certificate), to highest (certificate signed by root CA).
-
Root CA: Required
-
Private Key: Required
This example shows the Primary certificate, two Intermediate CA certificates, and a Primary Key:
----BEGIN CERTIFICATE----
(primary cert)
----END CERTIFICATE----
----BEGIN CERTIFICATE----
(intermediate CA cert that issued the primary cert)
----END CERTIFICATE----
----BEGIN CERTIFICATE----
(intermediate CA cert that issued the previous intermediate cert)
----END CERTIFICATE----
----BEGIN ROOT CA----
(root CA)
----END ROOT CA----
----BEGIN PRIVATE KEY----
(private key for primary cert)
----END PRIVATE KEY----
Step B: Anywhere USB Manager: Create a .pem file
The certificate information must be prepared so that it can be configured on the AnywhereUSB Manager.
Copy ONLY the primary certificate into Notepad, and save it as a *.pem file on your computer, in a location that is easily accesible.
Step 2: Load the AnywhereUSB Plus certificate onto the AnywhereUSB Hub
In this step, you will configure the certificate on the AnywhereUSB Hub using the certificate information you prepared in Notepad.
-
Copy the certificate information from Notepad.
-
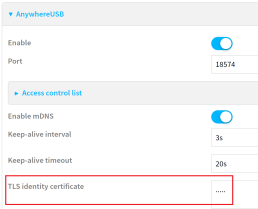
Navigate to System > Device Configuration > Services > AnywhereUSB.

-
In the TLS identity certificate field, paste all of the copied certificate information.
-
Click Apply.
-
Click System > Reboot.
-
After the reboot is complete, verify the certificate upload.
-
Navigate to System > Device Configuration > Services > AnywhereUSB.
-
If the upload was successful, five dots display in the TLS identity certificate field.
Step 3: Configure the AnywhereUSB SSL certificate in the AnywhereUSB Manager
In this step, you will add the AnywhereUSB SSL certificate *.pem file to the AnywhereUSB Manager.
-
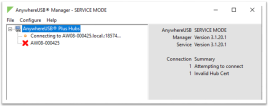
A red X displays next to the name of the Hub for which you uploaded the SSL certificate. In the Connection Summary section, the Invalid Hub Cert message displays.
-
Choose Configure > Manage Hub Credentials. The Manage Hub Credentials dialog appears.
-
Select the Hub that you want to update.
-
Click Update. The Choose a credential file dialog displays.
-
Navigate to the file location.
-
Select the *.pem file.
-
Click Open.
-
-
In a few seconds, the red X changes to a green padlock after the next connection attempt.

 PDF
PDF


