Program the firmware from U-Boot
Once you have the boot.img , recovery.img, and system.img already generated, you can use them to update your Android system from U-Boot. See Build the Android firmware for more information about building the Android system.
To flash the Android firmware from U-Boot, you must program a kernel (boot.img), a recovery boot image (recovery.img), and a root file system image (system.img) in the device's eMMC. Follow these steps to program Android in the eMMC of your ConnectCore 6:
Note See supported software to verify that your hardware is compatible with Android Lollipop.
- Power off the device.
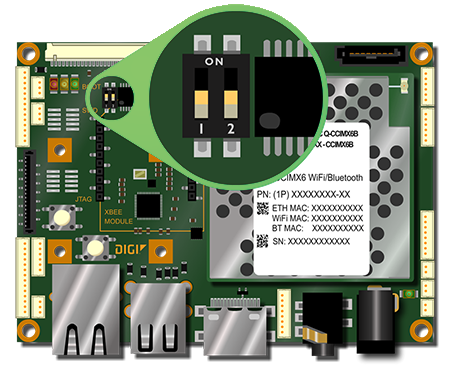
- Change the boot mode configuration to boot from the internal eMMC. To do so, set the boot mode micro-switches as follows:
- SW3.1 OFF
- SW3.2 OFF
- Place the system.img, the boot.img, and the recovery.img in the root of a FAT-formatted microSD card and insert it in the microSD socket of the ConnectCore 6 SBC.
After you build the Android firmware, these images are located inside the sources directory at
out/target/product/imx6_ccimx6_sbc. - Connect the serial adapter cable to the console port [CONS]. Connect a serial cable from the adapter to the development computer.
- Open a serial connection to the serial port to which the ConnectCore 6 is connected. Use the following settings:
- Port: Serial port to which ConnectCore 6 SBC is attached
- Baud rate: 115200
- Data Bits: 8
- Parity: None
- Stop Bits: 1
- Flow control: None
- Power on the device and immediately press a key in the serial terminal to stop the auto-boot process. You will be stopped at the U-Boot bootloader prompt:
U-Boot dub-2015.04-r8.3+g0de0373ade (Apr 23 2017 - 22:26:53)

CPU:   Freescale i.MX6Q rev1.5 1200 MHz (running at 792 MHz)
CPU:   Extended Commercial temperature grade (-20C to 105C) at 48C
Reset cause: POR
I2C:   ready
DRAM:  1 GiB
MMC:   FSL_SDHC: 0 (eMMC), FSL_SDHC: 1
In:    serial
Out:   serial
Err:   serial
ConnectCore 6 SOM variant 0x02: Consumer quad-core 1.2GHz, 4GB eMMC, 1GB DDR3, -20/+70C, Wireless, Bluetooth, Kinetis
Board: ConnectCore 6 SBC, version 3, ID 129
Boot device: MMC4
PMIC:  DA9063, Device: 0x61, Variant: 0x60, Customer: 0x00, Config: 0x56
Net:   FEC [PRIME]
Normal Boot
Hit any key to stop autoboot:  0
=>
=>
- Configure the partition table of the eMMC to hold Android images by executing these commands:
=> setenv mmcdev 0
=> run partition_mmc_android
- Update the kernel partition issuing this command:
=> update boot mmc 1 fat boot.img
- Wait until the process ends, then execute the following command to update the Android file system:
=> update system mmc 1 fat system.img
-
Wait until the process ends, then update the recovery partition issuing this command:
=> update recovery mmc 1 fat recovery.img
-
Wait until this process finishes to force the format of cache and data partitions:
=> bootargs_once="androidboot.cache=format androidboot.data=format"
Note If the cache and data partitions are already formatted or you wish to preserve their contents, you can skip this command.
- Boot the device executing this command:
=> boot
Note The first Android boot takes several minutes due to system deployment.
See also Update firmware from TFTP.


