Program I/O Expander firmware with USB multilink debugger
The P&E USB Multilink debugger is a hardware debugger that you can drive from a host computer via USB.
To program firmware using this debugger:
- You need a GDB server running on the debugger. Download and install NXP Kinetis Design Studio, which contains a GDB server for the P&E multilink debugger.
- Download the ELF image from the Digi ConnectCore 6UL product support web page.
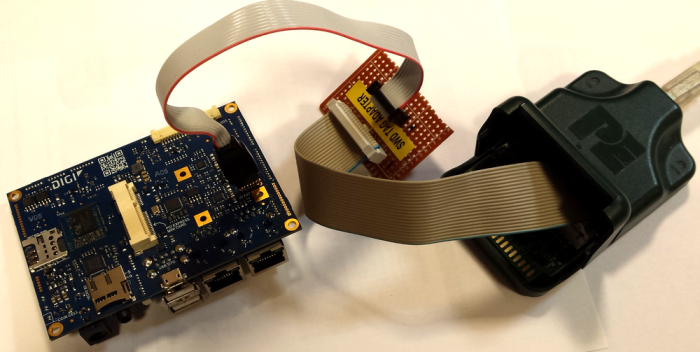
- Connect the debugger to the PC via USB, and to the I/O Expander SWD port on the carrier board via the adapter cable. You must hold the cable to keep it connected during the programming process.
- Power on the ConnectCore 6UL board. Both LEDs on the debugger light up.
- Run the Linux command line version of Kinetis Design Studio on your host computer with two parameters: -startserver to start the P&E GDB server and -device=<model> to specify the Kinetis model you are connecting to (NXP_KL1x_KL14Z32M4 for the I/O Expander).
/opt/KDS_v3/eclipse/plugins/com.pemicro.debug.gdbjtag.pne_2.4.1.201603202153/lin/pegdbserver_console -startserver -device=NXP_KL1x_KL14Z32M4
The server runs, detects the hardware, and lists the ports it is running on:
P&E GDB Server for Arm(R) devices, Version 5.79.00.00
Copyright 2014, P&E Microcomputer Systems Inc, All rights reserved

Loading library /opt/Freescale/KDS_v3/eclipse/plugins/com.pemicro.debug.gdbjtag.pne_2.4.1.201603202153/lin/gdi/unit_ngs_arm_internal.so ... Done.

Command line arguments: -startserver -device=NXP_KL1x_KL14Z32M4
Device selected is NXP_KL1x_KL14Z32M4
HW Auto-Selected : Interface=USBMULTILINK Port=PE5655301   ; USB1 : Multilink Universal Rev A (PE5655301)
Connecting to target.
P&E Interface detected - Flash Version 6.15

[...]

Server 1 running on 127.0.0.1:7224
Server 2 running on 127.0.0.1:7226
Server 3 running on 127.0.0.1:7228
Server 4 running on 127.0.0.1:7230
Server 5 running on 127.0.0.1:7232
Server 6 running on 127.0.0.1:7234
All Servers Running
- In another shell, source the Digi Embedded Yocto SDK environment:
source /opt/dey/2.2-r3/environment-setup-cortexa7hf-neon-dey-linux-gnueabi
- Run the GDB client:
arm-dey-linux-gnueabi-gdb
- At the GDB prompt, connect to the GDB server on the debugger (using one of the ports reported above):
target remote localhost:7224
The server reports "Connection from "127.0.0.1" via 127.0.0.1"
- Load the ELF file you want to debug/program with:
load filename.elf
This erases and programs the flash of the I/O Expander and loads it with the file.
- Continue execution of the loaded file with:
continue
- Quit the GDB server by pressing CTRL+C.
- The ELF file for the I/O Expander only contains the bootloader, not the full firmware. Once the I/O Expander has a bootloader, you can program the firmware using the ioexp_fw_updater application. Follow the instructions in I/O Expander firmware update to fully program the I/O Expander firmware.
- When finished programming, restart the ConnectCore 6UL to load the new firmware. Use the command sysinfo to print the firmware version and verify correct programming.


