Send a connect packet
Now that you know what a connect packet looks like, you can send a connect packet to a broker and view the response. Open XCTU and click the Configuration working mode button.
- Ensure that the device is set up correctly with the SIM card installed and the antennas connected as described in Connect the hardware.
- Open XCTU and click the Configuration working mode
 button.
 - Add the XBee Cellular Modem to XCTU. See Add a device to XCTU.
- Select a device from the Radio Modules list. XCTU displays the current firmware settings for that device.
- In the AP field, set Transparent Mode to [0] if it is not already and click the Write button.
- In the DL field, type the IP address or the fully qualified domain name of the broker you wish to use. This example uses test.mosquitto.org.
- In the DE field, type 75B and set the port that the broker uses. This example uses 75B, because the default MQTT port is 1883 (0x75B).
- Once you have entered the required values, click the Write button to write the changes to the XBee Cellular Modem.
- Click the Consoles working mode button
 on the toolbar to open a serial console to the device. For instructions on using the Console, see the AT console topic in the XCTU User Guide.
 - Click the Open button
 to open a serial connection to the device.
 -
From the AT console, click the Add new packet button
 in the Send packets dialog. The Add new packet dialog appears.
 -
Enter the name of the data packet. Name the packet connect_frame or something similar.
-
Click the HEX input tab and type the following (these values are the same values from the table in Example: MQTT connect):
10 10 00 04 4D 51 54 54 04 02 00 3C 00 04 44 49 47 49
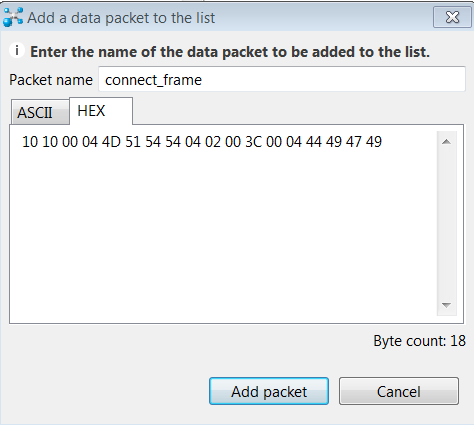
- Click Add packet. The new packet appears in the Send packets list.
- Click the packet in the Send packets list.
- Click Send selected packet.
- A CONNACK packet response from the broker appears in the Console log. This is a connection acknowledgment; a successful response should look like this:

You can verify the response from the broker as a CONNACK by comparing it to the structure of a CONNACK packet in the MQTT documentation, which is available at http://docs.oasis-open.org/mqtt/mqtt/v3.1.1/os/mqtt-v3.1.1-os.html#_Toc398718081).
 PDF
PDF


