Set up a third XBee module to create a mesh network
To create a mesh network, move XBEE_B away from XBEE_A until communication is lost. Then, add XBEE_C to relay messages between XBEE_A and XBEE_B. The network automatically adjusts and redirects communications when a pathway becomes available.
- Move XBEE_B out of range of XBEE_A:
- Disconnect XBEE_B from your computer and remove it from XCTU by clicking the Remove the list of remote modules button
 .
. - Connect XBEE_B to a power supply (or laptop or portable battery) and move it away from XBEE_A until it is out of range.
XBee module Indoor range (approximate) Outdoor range (approximate) XBee DigiMesh 2.4 100 ft (30 m) 300 ft (90 m) XBee-PRO DigiMesh 2.4 300 ft (90 m) 1 mile (1.6 km) The approximate indoor range is 100 ft (30 m), and the approximate outdoor range is 300 ft. (90 km).
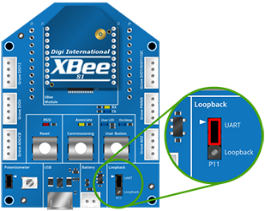
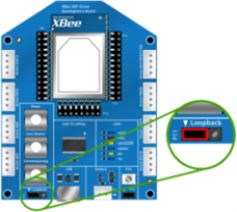
- Make sure the loopback jumper is connected to XBEE_B. See Connect the loopback jumper.
- In the XBEE_A console, click
 to clear your previous conversation with XBEE_B.
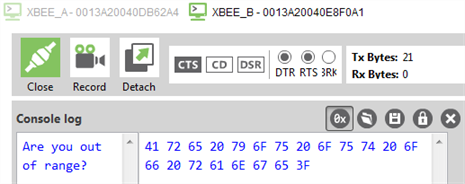
 - Type "Are you out of range?" In the illustration below, the message does not loop back, which means XBEE_B did not receive it and it is out of range of XBEE_A.
- If the message loops back, move XBEE_B farther away until it no longer loops back.
- Disconnect XBEE_B from your computer and remove it from XCTU by clicking the Remove the list of remote modules button
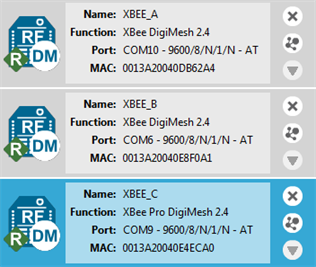
- Add and configure another XBee module:
- Connect another XBee module to your computer.
- Click the Configuration working modes button
 .
. - Click the Add a radio module button
 .
. - In the Add a radio module dialog, select the USB Serial Port for this XBee module and click Finish.
- Configure this XBee module as follows:
NI: XBEE_C - Click the Write radio settings button
 .
. 
- Have XBEE_C relay messages between XBEE_A and XBEE_B:
- Switch back to the Consoles working mode
 .
. - Disconnect XBEE_C from your computer and remove it from XCTU by clicking the Remove the list of remote modules button .
- Connect XBEE_C to a power supply (or laptop or portable battery) and place it between XBEE_A and XBEE_B.
- Make sure the loopback jumper is still connected to XBEE_B.
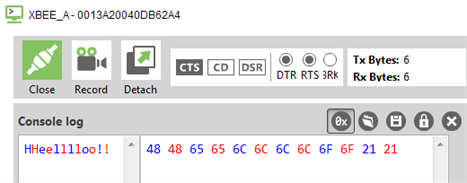
- Have XBEE_A send a message to XBEE_B. In the XBEE_A console, type "Hello!"
In the following illustration, the message loops back. XBEE_C relayed your message to XBEE_B, and you successfully established a mesh network.
Tip Use the Send a single packet command to send and have an entire message loop back, instead of having individual characters loop back. To do this, click the Add new packet button
 to compose your message, and then click Send selected packet to send your message.
 - Switch back to the Consoles working mode
Before you perform other tasks, change the loopback jumper on XBEE_B so it no longer bridges the two pins on its development board. It should look like this:
 PDF
PDF


